In an era driven by images, certain destinations seem to pop up again and again on travel feeds. What makes a place truly Instagrammable isn’t just a famous landmark, but a blend of striking visuals, cultural color, and shareable appeal. These spots deliver memorable panoramas – sun-dappled villages on clifftops, lush rice terraces, neon-lit cityscapes – that consistently earn likes and comments. For example, Santorini’s iconic white-and-blue architecture and Bali’s emerald rice fields top many “can’t-miss” lists because they immediately photograph well. In fact, researchers note that Instagram’s aesthetic emphasis has reshaped travel patterns, concentrating visitors in photogenic hotspots. Our list of 25 places draws on social media engagement, travel statistics, and expert input. We looked at visitor numbers, image tags, and cultural significance to rank spots that reliably inspire camera-ready moments.
Our final selection spans continents: from Europe’s dreamy villages (Santorini, Cinque Terre) to Asia’s cultural jewels (Bali, Angkor Wat) to natural wonders (Aurora-lit Iceland, Chile’s Atacama Desert) and beyond. Each one offers rich scenes for shutterbugs. We’ll discuss them throughout this guide, woven into gear advice and travel strategy. For context, the top 25 include Santorini (Greece), Bali (Indonesia), Cappadocia (Turkey), Kyoto (Japan), Machu Picchu (Peru), and many others known for picture-perfect vistas.
# | Destination | Country | Highlight |
1 | Santorini, Greece | Greece | White buildings with blue domes; sunset views |
2 | Bali, Indonesia | Indonesia | Rice terraces, temples (“Gates of Heaven”) |
3 | Cappadocia, Turkey | Turkey | Fairy chimneys & dawn balloons |
4 | Dubai, UAE | UAE | Ultra-modern skyline, Museum of the Future |
5 | Kyoto, Japan | Japan | Thousand torii gates & bamboo groves |
6 | Maldives | Maldives | Overwater villas, bioluminescent beaches |
7 | Iceland | Iceland | Glaciers, waterfalls, volcanoes & Northern Lights |
8 | Amalfi Coast, Italy | Italy | Colorful cliffside villages & Mediterranean views |
9 | Petra, Jordan | Jordan | Rose-red rock carvings (Treasury) |
10 | Machu Picchu, Peru | Peru | Inca citadel above clouds |
11 | Bora Bora, FP | French Polynesia | Volcanic lagoon & overwater bungalows |
12 | Paris, France | France | Eiffel Tower & romantic streets |
13 | Banff NP, Canada | Canada | Turquoise lakes (Moraine, Louise) |
14 | Marrakech, Morocco | Morocco | Colorful souks and gardens (Majorelle) |
15 | Tokyo, Japan | Japan | Neon cityscapes (Shibuya, teamLab) |
16 | Hallstatt, Austria | Austria | Alpine village on lake |
17 | Chefchaouen, Morocco | Morocco | Entire medina in blue |
18 | Angkor Wat, Cambodia | Cambodia | Ancient temple complex (UNESCO) |
19 | Plitvice Lakes, Croatia | Croatia | Emerald lakes and waterfalls (UNESCO) |
20 | Salar de Uyuni, Bolivia | Bolivia | Endless salt flats (mirror effect) |
21 | Dubrovnik, Croatia | Croatia | Medieval city walls by Adriatic (Game of Thrones) |
22 | Great Barrier Reef, Australia | Australia | Vibrant coral reef (snorkeling paradise) |
23 | Zhangjiajie, China | China | Columnar peaks (inspired “Avatar” scenery) |
24 | Cinque Terre, Italy | Italy | Five pastel cliffside villages (UNESCO) |
25 | New York City, USA | USA | Iconic skyline, parks, street scenes |

Santorini’s cascading white villages and cobalt domes atop a volcanic caldera make it instantly recognizable. The stark contrast of whitewashed Cycladic houses clinging to black lava cliffs is nothing short of cinematic. Through the day the caldera offers “breathtaking views”, but it truly captures imaginations at sunset, when the golden hour bathes Fira and Oia in a warm glow. Onlookers compare it to an open-air amphitheater: the caldera rim is the stage, and the sinking sun its star.
Early in the season (April–June) and after summer (September–October) are ideal. Temperatures hover comfortably (mid-70s–low 80s°F) and beaches and tavernas are welcoming. Arrival off-season means fewer day-trippers and longer shadows. Plan your timing: Oia’s waterfront and the Fira-Imerovigli trail see crowds by mid-afternoon, so many photographers rise pre-dawn or linger after dusk to find the streets nearly empty.
Historical Note: Santorini’s modern charm overlays an ancient past. In 1627 BCE a cataclysmic volcanic eruption buried the Minoan town of Akrotiri under ash, preserving frescoes and even furniture. Dubbed the “Greek Pompeii,” Akrotiri reveals Bronze Age life amid Santorini’s black sands. The island’s very topography – the caldera formed by collapse – was thus shaped by catastrophe, giving today’s photographers the dramatic cliffs and sea views they adore.
Iconic imagery abounds: three blue-domed churches in Oia, narrow alleys of Fira perched at 260 m above the sea, and citrus groves perched on terraces. Santorini’s brand is strong – “postcard” vistas are literally drawn from Oia’s lookout – and every angle seems optimized for social media. As one official guide notes, “Soaking up the villages’ distinctive topography – whitewashed houses and alleys vs lava-black terrain – is a rewarding experience that one might say is unique!”. In short, its architecture and nature form a photographer’s dream palette.
Classic Spots (with GPS coordinates):
Late spring and early fall bring balance: warm sun and thin crowds. Sunrise here is subtle (the sun rises behind the island’s spine), so sunset is the sought-after spectacle. By 7–9 pm in summer, Oia’s alleys and cliff’s edge swell with viewers. Photographers often stake out the famed castle lookout early and watch the light deepen. Golden hour lasts longer due to clear Aegean skies – an hour of soft, warm light perfect for silhouettes against domes.
Insider Tip: For a crowd-free Oia frame, come before 6 am or after 9 pm. By dawn the main viewpoint is empty; by late dusk most tour buses have departed. Walking the caldera path toward Fira in the soft morning or under stars by night yields unique shots (lantern-lit town and quiet seawater reflections) that dawn or dusk photographers cherish.
Midday also has charm: strong blue sky against white buildings. To manage highlights, shoot toward the sun to catch lens flares on the domes, or underexpose slightly to preserve detail in shadows.
Parking is scarce and tour buses clog narrow streets. Strategy: Sleep in Oia or Firostefani (Imerovigli) to exit before the day-trippers arrive. Walk the Fira–Oia trail at sunrise; the first half-hour often sees only hikers. Alternatively, hop on the evening ferry from Amoudi Bay to Fira (e.g. 8pm) – you’ll sail past caldera lights and disembark into almost-empty Fira. Locals note “the number of tourists is simply too much,” so they welcome anyone who respects the village pace.
Local Perspective: Village elders grumble at the hoards. In 2023 residents even staged a road blockade citing “mass tourism” pressures. In practice, this means photogs should tread softly: avoid commercialized selfie props, yield to locals in narrow alleys, and time shots before the main plazas fill. The gentlest approach often wins the best candid: sometimes the frame weaves in a local fisherman, a vine-draped terrace, or church bells overhead – details invisible if you’re jammed shoulder-to-shoulder with a crowd.
Wide-angle lenses are invaluable here: f/8–f/11 keeps both foreground (balconies, bougainvillea) and distant caldera sharp. A polarizer saturates the sky and cuts glare on water. For silhouettes (e.g., castle against sunset), use spotmeter on the bright horizon, then dial in – the iconic black outlines emerge. At dawn or dusk, ISO 100–200 with a tripod allows 1–2 second exposures for silky water in Amoudi or Oia’s harbor. If shooting handheld midday, be mindful of high contrast; try HDR stacking for balanced images of alleys. Finally, frame Oia’s blue domes next to laundry lines or fruit stands – a trick to humanize the scene.
Greece uses the euro. Santorini’s airport (JTR) has regular flights from Athens; budget ferries from Piraeus or Rafina serve high season. Public buses between villages are cheap (€1.80–€2.50) but crowded; consider renting a scooter (from ~€25/day) for more flexibility. Entrance to main attractions (like Akrotiri or the Museum of Prehistoric Thera) costs €12–€15. As of 2026, Schengen visa rules apply for non-EU travelers. Daylight runs roughly 6:00–20:30 in summer (sunset near 20:30), less in winter. Plan as of 2026: travelers note that booking accommodations well in advance yields the best rates.

Bali’s mix of emerald rice terraces, towering volcanoes, and spiritual temples makes it Instagram’s perennial favorite island. As one travel writer put it, Bali “is home to some of the world’s most photogenic spots” – “everything that screams #feedgoals”. Ultraviolet sunsets, jungle pools, and colorful Balinese architecture provide endless photo ops across the island.
Bali’s appeal spans nature and culture. Writers note it has “lush rice fields, spiritual sea temples, and sacred shrines”. Its tropical greenery and blue seas contrast with ornate Hindu temples (e.g. cliffside Tanah Lot or seaside Uluwatu). Bali’s friendly culture and wellness vibe (yoga, coffee shops, swings) also lure content creators. With year-round warm weather, Bali’s scene is always active on Instagram.
Bali has signature images that appear everywhere:
Each of these motifs plays to Bali’s strengths of nature + culture. Photographers often combine them with lifestyle (yoga poses, coconut drinks) for the perfect Bali shot.
Bali’s north/central regions (around Ubud, Munduk) are lusher and quieter – think emerald jungle, rice fields, traditional villages. Shots here lean green and tranquil (teal water spring pools, terraced panoramas). By contrast, South Bali (Seminyak, Kuta, Nusa Dua, Uluwatu) emphasizes golden sunsets, surf beaches, and nightlife. Expect vibrant beach club photos (swim-up bars and fire dancers) and party scenes. The division is clear in feeds: southern shots often glow orange at sunset, northern ones burst with green foliage.
Timing is key in Bali photography. For sunrise, head to the temples: Pura Lempuyang (“Gate of Heaven”) or the terraced Ulun Danu (Bratan) look ethereal in morning mist. Fewer tourists at 6am mean you can frame the temple against a pastel sky (some go as early as 4:30am). For sunset, Bali’s western coast and cliff temples are unbeatable. Uluwatu Temple on the Bukit Peninsula offers fiery skies over the ocean. Or capture Seminyak beach clubs (Finns, Potato Head) where palm-thatched cabanas glow under neon lights. (One tip: check for local rituals – sometimes smoke or ceremonies occur at dusk at temples, which can add atmosphere to photos.)
Bali is drone-friendly for hobbyists, but rules apply. As of 2026, recreational drones under 2kg require no license if flown in uncontrolled airspace and below 150m. You must keep the drone within line-of-sight, at least 15 km from any airport (Ngurah Rai/Denpasar), and avoid crowds or sensitive sites (prisons, temples during ceremonies). Commercial drones or heavier models do require permits from Indonesia’s aviation authority. Always register your flight plan in advance if your use is anything beyond casual sightseeing. (In practice: flying a DJI Mini for fun around rice fields or beaches is fine; just beware the no-fly zone around Denpasar Airport.)
Bali travel tips: Indonesian Rupiah (IDR) is needed (ATMs are widespread, credit cards accepted in cities). English is commonly spoken in tourist areas. Rent a scooter or driver to move between far-flung spots safely. Respect local culture: wear sarongs at temples and avoid swimwear-only outside beaches. Bali’s weather is tropical – expect rain mainly Nov–Mar. Sunscreen and mosquito repellent are a must. Lastly, Bali is wifi-friendly in towns, but rural areas can have spotty reception – download maps and keep batteries charged on remote hikes or temple climbs.

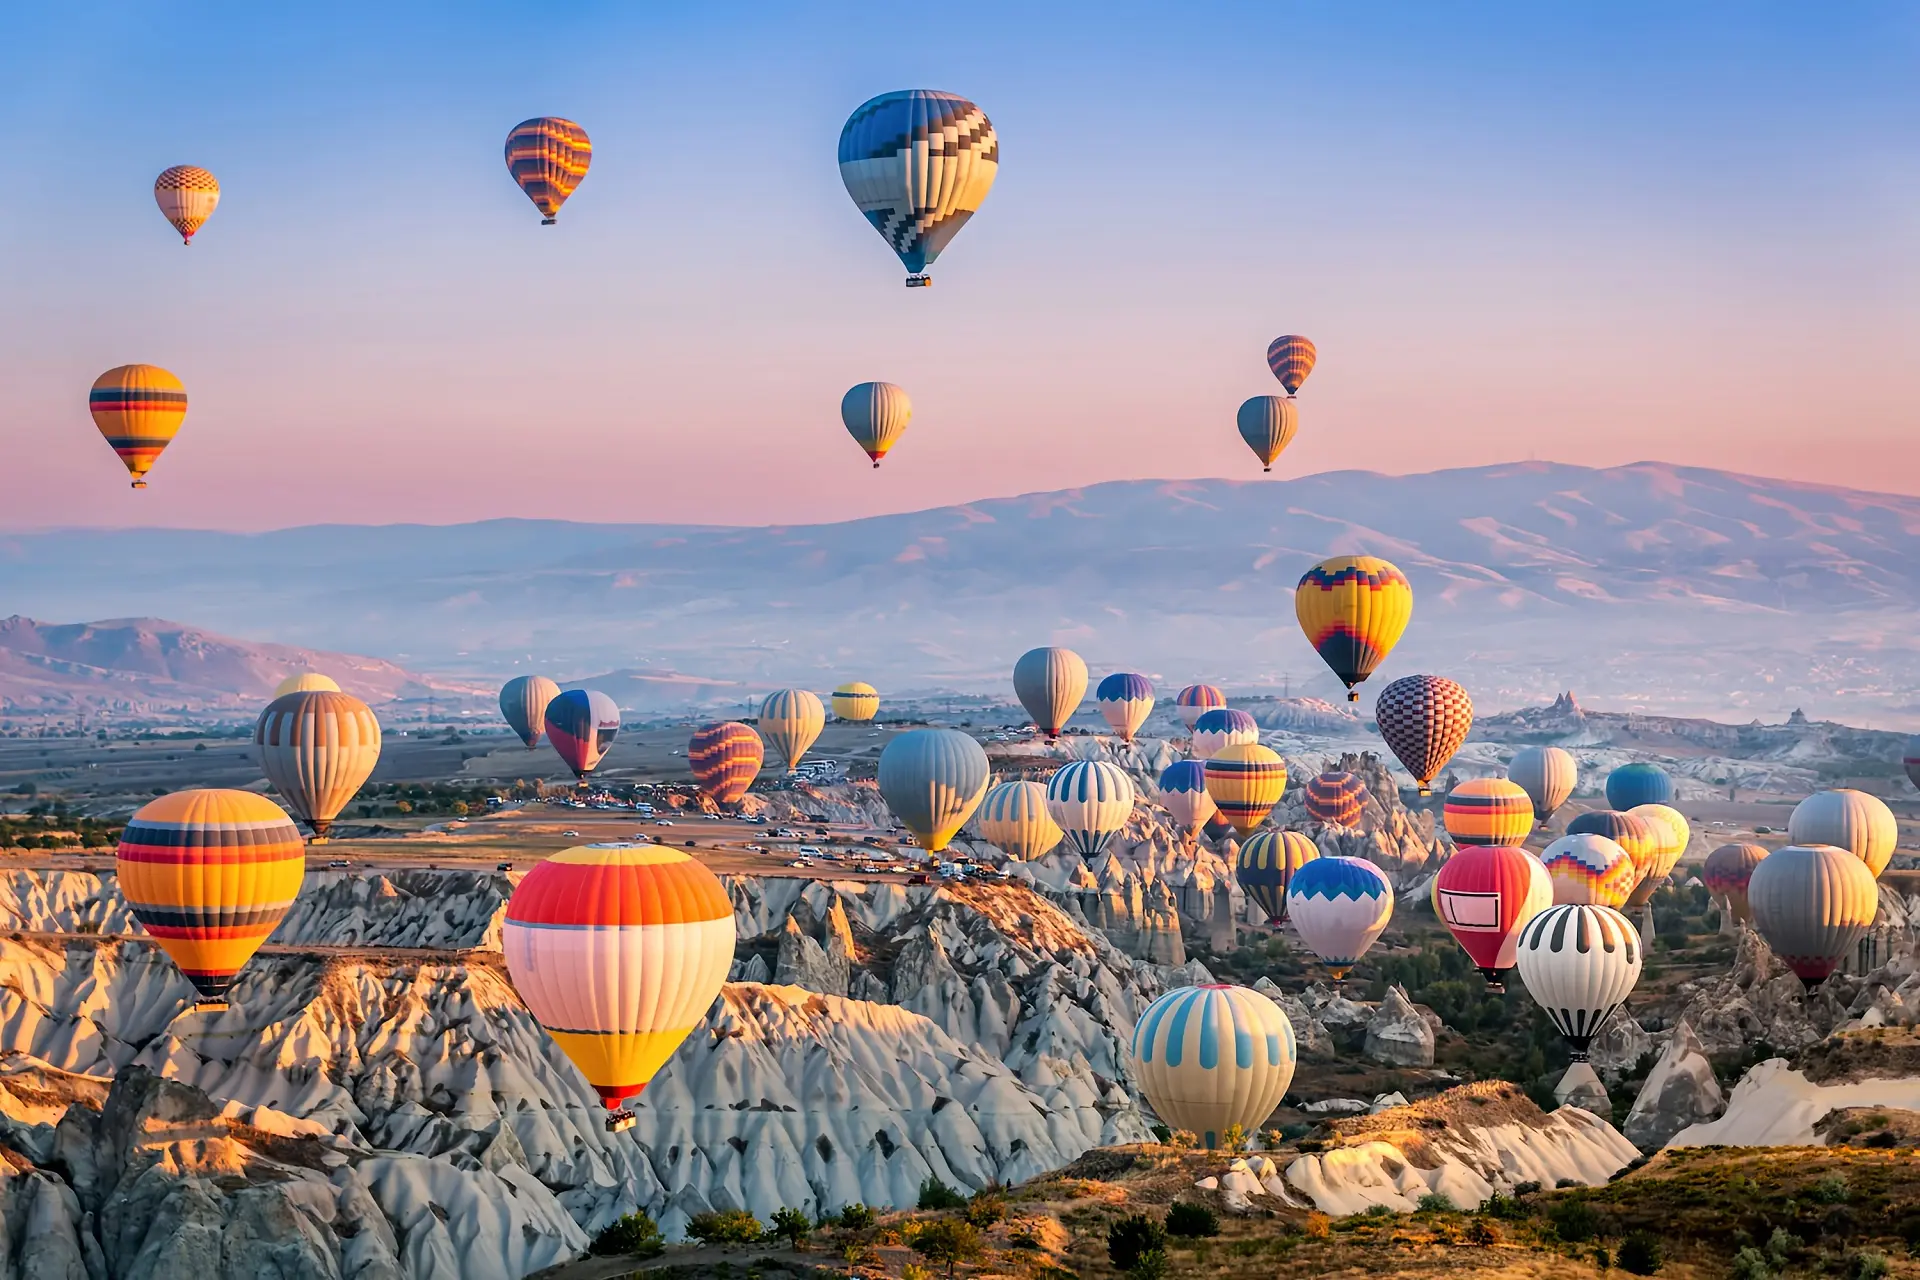
Few sights rival hundreds of multicolored balloons rising at dawn against Cappadocia’s alien-like terrain. Göreme and its valleys (Rose, Red, Pigeon) glow with early sunlight as balloons spiral upward. Cappadocia is literally the world’s hot-air balloon capital: on a good weather day about 156 balloons will launch simultaneously, coloring the sky. These airborne lanterns create a festive atmosphere – the perfect reason to set an alarm for 4:30 AM. Camera Tip: Use fast shutter speeds (1/1000–1/2000s) to freeze motion, and a mid-range zoom (24–100mm) to capture balloons filling the frame with landscape below. For a unique shot, silhouette the balloon against the rising sun, or include the chimneys below. Fun fact: Cappadocia logs balloon-friendly weather about 220 days/year, so there’s a great chance of flight any time between April–November.
On the ground, popular viewing spots include the Göreme Panorama and Uçhisar Castle – climb high for wide vistas of dozens of balloons. When you’re in a balloon basket, a clear sky (no propeller buzz, only silence) gives epic aerials: parallax shots of chimneys receding beneath, or looking down into spires and cave villages. Bring a neck strap, wide-angle (~16–35mm) and standard zooms. Avoid leaning too far out for safety; sometimes standing on the bench for a higher view is enough. Also be mindful: Sunrise tints the valley pink and gold, so shoot with some exposure compensation. On windy launch days, plan B for photography is sunset from the valleys – very dramatic too.
Cappadocia’s landscape is defined by “fairy chimneys” – tall rock pillars carved by erosion. Valleys like Love Valley, Pasabag (Monks Valley) and Zelve have the densest concentrations. For compositions, use nearby chimneys as foreground interest with balloons or sky behind. Many of these unique rocks have been hollowed into homes, churches, and hotels. In Göreme you can even stay in a cave hotel, with rooms dug into volcanic tuff. For architecture shots, include the stone-carved façade of Kaymakli or Derinkuyu Underground Cities (30+ m deep tunnels), or rock-hewn churches with Byzantine frescoes in Göreme Open-Air Museum. When light is low, long exposures (and a tripod!) will reveal warm-lit windows and interiors in these volcanic caves.
Hot-air balloons steal the spotlight, but Cappadocia has plenty more. Hike through Rose or Red Valley in early morning or late afternoon light – the soft mushroom rock forms become surreal under changing skies. At Sunset Point near Göreme, climbers gather to watch golden hour. On clear nights, star trails over fairy chimneys are spectacular (use exposures of 30s+ on a tripod). Ancient cave churches with faded frescoes dot the region – for example, Dark Church (Karanlık Kilise) or Elmali Church. Inside, turn off flash and use a wide aperture/iso to capture color detail. Lens choice: Wide zooms for valleys, telephoto (100–200mm) for distant minaret or camel silhouette shots at sunrise.
Balloons fly year-round except extreme winter or stormy days. Book in advance, especially for summer or peak holiday weeks – popular companies sell out. Expect to pay ~€150–200 per person (includes a 1-hour flight and champagne toast). Rides launch at dawn – you’ll get pick-up by minivan around 4:30–5:00 AM from your hotel. Safety is high: companies use fuel-efficient burners and experienced pilots. The only no-fly days are high winds or fog. Official numbers: Cappadocia runs flights about 220 days a year, so if it’s grounded one day, try again the next. Photo tip: To avoid vibration blur in the basket, shoot with IS/VR on and use higher ISOs if needed.

Dubai’s skyline is a testament to modern ambition – gleaming skyscrapers, astonishing feats of engineering, and luxury everywhere you look. It’s literally a city built for Instagram: futuristic architecture rises out of the desert (and even under the sea!). The Burj Khalifa (829 m) dominates the city (see below), but everywhere you turn there’s another bold design: islands shaped like palms, a sail-shaped hotel, driverless metros, and indoor ski slopes. For photographers, Dubai means ultra-clean lines, glass-and-steel contrasts, and neon nightscapes. Best time to shoot exteriors is golden hour or after sunset when LED lights kick in. Lens tip: A wide-angle is needed for the Burj and surrounding towers; telephoto compresses distant silhouettes of towers.
The iconic Burj Khalifa attracts photo snipers, but you can get creative. Instead of only shooting from its at-the-top deck (which is amazing but often crowded), try:
Dubai loves bling in its architecture. Two novelties: the Dubai Frame (opened 2018) – a 150m-tall golden “picture frame” in Zabeel Park – and the brand-new Museum of the Future (2022) – a 77m torus covered in Arabic calligraphy. Both make great photo subjects. At Dubai Frame, you can shoot from the base looking up into its glittering rectangle, or go to the top “sky deck” for 360° panoramas (book slots online). The Museum of the Future’s shiny ring, located between Dubai Metro and Sheikh Zayed Road, reflects the sky – try nighttime shots when its illuminated calligraphy glows. Nearby, the Dubai Opera and JW Marriott Marquis (twin towers) add more frame-worthy forms.
A short drive (about 1 hour) from the city center takes you into the golden dunes of the Arabian Desert. Desert safaris (by 4×4 or camel) offer stunning backdrops: undulating sand patterns, sunlit dunes, and endless horizons. Plan your shoot for sunrise or sunset – the low light casts long shadows that sculpt the dunes. Red, orange and pink dunes pair beautifully with the sky’s blues. On many tours, falconry displays occur; freeze the birds in flight with a fast shutter. For night photography, clear skies allow star trails (try long exposures of 30s+ with a tripod against dark dunes). Pro tip: Bring a lens cloth – sand can stick to your lens and gear.
Dubai’s hotels aren’t just places to sleep; their rooftops are vantage points. For example, the Skyview Bar at Burj Al Arab, Level 43 Sky Lounge in Emirates Towers, or White Beach Club at Atlantis The Palm each offer amazing skyline views (though often with a food/drink minimum). Many pool decks also provide great angles: think the infinity pool at Atlantis The Palm (with city in distance) or Lounge at Address Sky View (peeking at the Burj). These spots let you shoot morning reflections in water, or neon-lit poolside scenes at night with architecture behind. (Always check dress code; in most upscale rooftops swimwear is only at the pool itself.)

Kyoto embodies the “soul of Japanese aesthetics”. Ancient temples and tranquil gardens (like the Sagano Bamboo Grove above) coexist with neon-lit streets and fashion boutiques. Kyoto’s deliberate design – Zen simplicity and seasonal motifs – made one travel writer call a temple “a glimpse into the soul of Japanese aesthetics”. This blend of old and new gives Kyoto its unique photogenic appeal.
In Kyoto, attention to detail and seasonal beauty is everywhere. Manicured gardens like those of Kinkaku-ji or Ginkaku-ji change from cherry blossom pink to maple red each year. Low wooden shrines and stone lanterns (often lit by candle) emphasize simplicity. Even modern shots feel meditative: for example, Ginkakuji’s garden is described as “a glimpse into the soul of Japanese aesthetics”. Strive for serene compositions: temple courtyards with single blossoms, or mossy stone paths under bamboo groves. The key is capturing quiet, balanced frames that reflect wabi-sabi.
Kyoto’s most famous Instagram icon is Fushimi Inari Taisha (the red torii gate shrine). As one guide notes, “you’ve seen the iconic red torii gates… before even arriving in Kyoto.” It’s “one of Japan’s most photogenic destinations”. To photograph Inari’s famous tunnel of 1,000 red gates, go very early (or very late) to avoid crowds. The gates snake uphill through bamboo forest – try framing them in succession to emphasize depth. For variety, shoot from both ends of the tunnel or off-center so the path curves through the frame. (Beware: there can still be tourists even in early morning, so patience is needed.) Night photography is another option – long exposures of the lit gates under stars.
Arashiyama’s Bamboo Grove is utterly iconic. Unfortunately it’s also packed by mid-morning. To get it almost empty, visit at dawn on a weekday. Otherwise, try adjacent sites like the nearby Tenryu-ji Garden (for bamboo reflections) or head deeper into Arashiyama. The sentiment from Fushimi Inari visitors holds: “We expected the same crowds in a much smaller area” here. By going early, you can capture the tall stalks stretching up without jostling tourists. Use a wide-angle lens low to the ground for dramatic converging lines of bamboo.
Kyoto’s seasons make or break photos: Sakura (cherry blossom) season usually peaks in early April. Plan to be in Kyoto late March–early April and check local bloom forecasts (Kyoto’s tourism bureau posts daily updates). Famous cherry blossom spots include the Philosopher’s Path, Maruyama Park, and Kiyomizu-dera. Autumn foliage peaks in mid-November (november 15–25) at temples like Tofukuji, Eikando, and Arashiyama’s Tenryu-ji. (If you miss peak, even partial fall color provides warm tones.) Tip: While cherry season draws overwhelming crowds, many smaller shrines also bloom – it’s worth finding a quiet alley lined with petals than fighting for space at the popular spots.
Kyoto’s Geisha (geiko/maiko) districts (e.g., Gion, Pontocho) offer the chance of spotting a maiko in profile. However, strict etiquette applies. Photography is banned without a permit on many Gion streets. Kyoto’s official guidelines explicitly warn: “Do not stop, touch, follow, or take unauthorized photos/videos of any geiko or maiko”. If you do encounter geisha, do not call out or block their path. A respectful strategy is to capture them in motion from the side, or photograph them from a distance (never front-on). In practice: no sudden movements or bright flashes. If they notice you, a polite bow in appreciation is acceptable. (One workaround for a posed photo is to arrange a professional geisha photo studio shoot, which respects all cultural rules.)
Kyoto’s attractions are spread out. The city has an extensive bus network and subway, but renting a bicycle or taxi can save time (and are very popular). Obtain a Suica/PASMO travel card for smooth transit across Japan (unlimited bus/trains without buying tickets each time). Street photography in Japan is generally legal, but be mindful of tripod rules (some busy streets or stations restrict gear during rush hours). Downtown Kyoto is very safe – watch your belongings in crowded trains during rush. FYI: many temples charge a small entrance fee (¥300–600). Plan more time than expected; photo-friendly spots like Ginkaku-ji or Arashiyama merit a full morning each.

Turquoise lagoons and white-sand beaches make the Maldives a textbook “paradise” for photographers. Remote island resorts with overwater villas on stilts epitomize tropical luxury. As one travel guide puts it, “the Maldives, a paradise of turquoise lagoons, sugar-white beaches, and overwater luxury, is a dream destination for photographers and Instagram enthusiasts”. To capture its postcard perfection, focus on the vivid blues of the water and sky. Shoot midday (roughly noon–3 PM) when the sun is high: sunlight reflecting off the shallow white-sand seabed will flood the water with all shades of blue. For palm-framed compositions, include a swaying tree or a resort’s water villa in the foreground to give context and scale. Early mornings and late afternoons yield golden light and long shadows, so plan to shoot at sunrise or sunset for romantic silhouettes of palm trees or bungalow profiles.
The iconic overwater bungalows are the Maldives’ muse. To emphasize their charm, compose shots with the villa centered in the frame or along a leading wooden boardwalk. Include crystal-clear water beneath (some bungalows even have glass floor panels!). When shooting people on the decks or walkways, use wide-angle lenses to include the horizon. For sunset portraits, turn off flash and simply expose for the sky’s warm tones – the “golden hour” casts a soft glow on faces and thatched roofs. Add visual interest by including splashes of color: contrast blue water against colorful swimwear or props. One guide suggests adding elements like “a palm tree, the water villa…floating tray breakfast at your villa, beach, [or] glass-bottom kayak” in the frame to scream “I’m in the Maldives”. In short, highlight the thatch-roof huts and endless sea – that’s the essence of an overwater-bungalow shot.
Below the waves, the Maldives offers equally breathtaking scenes. So bring an underwater or waterproof camera for reef and fish shots. The midday sun makes underwater color pop: as noted above, the strong overhead light “lights up the water with all shades of blue”. Use a wide-angle underwater lens to capture coral gardens and schools of tropical fish. If photographing snorkelers, shoot from slightly above so you see both swimmer and reef beneath. For close-ups of reef or reef fish, use a macro or zoom lens and steady your shot (a tripod or floatation device helps due to low light under overhangs). Be sure to keep the sun at your back when diving down: this front-lighting technique reduces shadows on the subject and deepens water color. The Maldives’ water clarity is famous – reefs teem with vivid coral and tame reef sharks or rays – so dive in early (water calmest) and shoot fast-moving subjects with high ISO/settings as needed.
An ethereal bonus in the Maldives is its glowing beaches: at night, plankton can emit a blue-green luminescence in the shallow surf. To capture this, use long exposures (5–30 seconds) on a tripod, with a DSLR or phone in “night mode.” Time your shot right after wave swishes; motion blur will streak bioluminescence. Use very low ISO to avoid noise, and frame a subject’s footprints or a shoreline curve to add context to the glow. (Note: bioluminescent conditions vary by season and lagoon; research local reports.) Even if you can’t capture the glow on camera, carrying a blue LED or smartphone light can recreate the twinkling effect on wet sand for an insta-shot.
The Maldives is known for luxury, but budget travel is growing. Staying on local islands (instead of private resort islands) dramatically cuts costs. Local guesthouses often have rates up to “60% discounted” off resort prices. These islands (like Maafushi or Thulusdhoo) offer basic rooms and access to reefs for snorkeling. Meals and excursions (fishing, diving) are priced for regular travelers, not just honeymooners. You still get the crystal-clear water and coral gardens – one guide notes these local stays “offer a different version of paradise”. In practice, a budget traveler can often find comfortable guesthouses for $50–$200 per night (all-inclusive luxury starts at $400+) and share boat tours to famous sites. The Maldives even has a visa-on-arrival policy for most nationalities, so getting there doesn’t require advance paperwork.
Currency: Maldivian Rufiyaa (MVR), but US dollars are widely accepted at resorts. Language: Dhivehi (official) and English (common in tourism). Visas: Visa on arrival (30 days) for most nationalities. Electricity: 230V, UK-style plugs (3-pin), though resorts usually adapt. Connectivity: Wi-Fi is common at resorts. Travel Tip: The Maldives spans many atolls, so plan logistics: domestic flights or speedboats can connect you to far islands. The best time for clear skies is winter (Nov–Mar, dry season) – summer monsoon (Jun–Oct) brings more rain and haze. However, locals note that anytime on a Maldivian atoll feels like paradise, just a short boat ride from Male.

Iceland’s scenery looks almost alien – lava fields, glaciers, volcanoes and geothermal vents dominate. Everywhere you turn the land feels sculpted by fire and ice. Black sand beaches stretch to crashing waves, and broad mossy lava plains contrast with gleaming blue glaciers. Famous waterfalls like Skógafoss or Goðafoss plummet from plateaus, often framed by rainbows in mist. In winter, these collapse into pillars of ice. Such terrain earns Iceland its reputation for “unbelievable” northern lights and stark contrasts. Simply put, an Icelandic scene can go from glacier lagoon to steaming hot spring to midnight sun in a single day, making it a dream canvas for landscape photography.
Iceland’s Ring Road (Route 1) circles the island and stitches together the must-see sights. Driving it (often counter-clockwise from Reykjavik) lets you hit the highlights: the Golden Circle (Þingvellir, Gullfoss, Geysir) plus the south coast’s towering falls (Seljalandsfoss, Skógafoss) and black beach at Vík. Further east lies the glacial lagoon Jökulsárlón with its icebergs, and nearby the “Diamond Beach” strewn with ice chunks. In the north, the Mývatn area offers volcanic craters and lava formations. Every stop is a photo op – from quaint turf churches in the countryside to the haunting Solheimajokull glacier plane wreck. In short, plan to stop every few miles: the Ring Road itinerary is essentially a gallery of jaw-dropping landscapes and hidden gems.
Iceland is prime Aurora country. The Northern Lights can dance on clear nights roughly September through April, when darkness reigns. (Mid-summer’s “Midnight Sun” prevents aurora visibility.) To capture auroras, head into the countryside away from city lights, with a sturdy tripod and wide-angle lens. Use a long exposure (5–30 seconds) and low ISO (to reduce noise) – check aurora forecasts (KP index) and moon phases: new moons are best for dark skies. Glacial foregrounds (like Jokulsarlon’s floating ice or Snæfellsnes’s iconic Kirkjufell mountain) make dramatic compositional elements under the swirls of green. As one guide notes, Iceland’s latitude (around 66°N) means the aurora may even appear overhead, yielding vivid overhead arcs. Always monitor weather: clear, cold nights after a cold front often bring the strongest displays.
Iceland’s natural attractions are famously photogenic. Waterfalls abound – e.g. Seljalandsfoss, which you can walk behind, or Dettifoss, Europe’s most powerful. Fiery volcanoes and icecap glaciers (like Vatnajökull) are monumental backdrops. Don’t miss the blue-ice caves that form in winter along Vatnajökull’s tongue glaciers – shoot these with a tripod (low light) and wide lens to capture the ethereal blue ice textures. On the south coast, Reynisfjara’s black-pebble beach with its basalt columns (Reynisdrangar stacks rising from the sea) is a striking contrast of volcanic sands and ocean. Sunrise or sunset brings soft light on the black beach, and careful framing (e.g. including the silhouetted rock pinnacles) shows how unique Iceland’s coast is.
Icelandic ice caves (in Vatnajökull and Mýrdalsjökull glaciers) open each winter when conditions allow. To photograph them, always go with a guide (safety first – caves can collapse). Inside, light is very dim, so use a wide-angle lens and sturdy tripod. Set a slow shutter (several seconds) with ISO 100-200 for detail in the blues of the ice walls. Minimal equipment might include waterproof gloves and lens cloths to battle dripping condensation. Use the cave’s natural blue glow and tricks like a person at the entrance (as a tiny silhouette against glowing ice) to show scale. Backlighting the ice roof reveals its translucence. Remember: these caves melt by spring, so winter visits require flexibility and gear for snow and cold.
Currency: Icelandic Krona (ISK). Language: Icelandic (most people speak English fluently). Getting Around: A 4WD vehicle is not always required on main Ring Road in summer, but is recommended if you plan off-the-beaten tracks or winter travel. Seasonal Tips: Summer (Jun–Aug) brings midnight sun (up to 24h daylight), green landscapes and puffins. Winter (Oct–Mar) is cold and dark, but prime for Northern Lights and ice caves. Weather: Changeable; always carry waterproof and thermal layers. Permits: None for general travel, but some caves/hikes require a guide. Safety: Watch for sneaker waves at coasts and obey local guides on glaciers. The “blue ice” in caves looks stable but can break unexpectedly, so never enter an ice structure without expert advice.

Portugal’s Algarve? Mediterranean nowhere compares to Amalfi’s photogenic drama. Here steep limestone cliffs are dotted with terraced lemon groves and pastel houses that tumble toward turquoise waters. The UNESCO designation “Costiera Amalfitana” nods to its “exceptional cultural and natural scenic values”. Positano’s multilevel facades, Ravello’s gardened heights, and Amalfi’s domed cathedral all evoke classic Italian charm. As one Italian tourism guide notes, the coast’s hilltop gardens and villas are “appreciated by professional photographers and amateurs” alike – in short, it is a photographer’s dream.
Sharp contrasts define the imagery: sugary-white chapels above deep blue sea, vibrant bougainvillea spilling over ochre buildings, and dizzying staircases. Villa gardens (Villa Cimbrone’s “Terrazza dell’Infinito” and Villa Rufolo’s Moorish cloisters) gave 19th-century romantics icons to paint, and today they are among the Amalfi Coast’s most-lauded views. The topography itself is sublime: UNESCO’s brief on the site explains that a dramatic mix of sheer mountains and centuries of olive-terraced slopes has created an “outstanding cultural landscape”, one where human handiwork and nature blend seamlessly. In sum, this coastline looks as if it were designed expressly for dazzling photography.
Every village is a shoot location. Key vantage points include:
Other “gotta-get” images: the winding Path of the Gods trail above Nocelle (for sweeping panoramas) and lemon groves glowing in afternoon sun. In Positano, every ceramic shop and pastel alley is photogenic; for instance, the historic Ceramica Assunta facade (via del Saracino) glitters under midday light, making for a bold splash of color.
Summer (July–Aug) is dazzling but packed. The quietest light is found in shoulder months: May–June and Sept–Oct. Evenings in late summer are warm, while spring offers wilder greens and fewer tour buses. Within each day, morning often wins for clear views and empty streets. For Ravello’s gardens, mid-morning to early afternoon light is ideal, as it strikes the villa facades without harsh shadows. Positano, facing west, lights up dramatically at sunset – though it also crowds up: getting below 5 pm means easier access to the top terraces. Conversely, Praiano (a village between Positano and Amalfi) catches the last rays; its Piazza San Gennaro and San Domenico path are stunning in the golden hour. Plan rooftop dinner in Positano or cocktails in Ravello just as the sun dips.
Insider Tip: The Amalfi road (SS163) itself is a slow drive but every corner is a viewpoint. If renting a car, pause at unmarked overlooks (e.g., just west of Amalfi city) for cerulean wide-angles. Or let the ferry handle transport: a short sea trip from Salerno to Positano/Atrani yields views of the entire coast line-up, avoiding snarls on the switchbacks. Ferries are “scenic and economical,” offering unobstructed 180° panoramas of cliffs and villages.
A polarizer is a must to deepen sea blues and cut reflections on the water and tile roofs. Use a telephoto (70–200mm) to capture distant layers of coastline across the gulf, and a wide-angle (24–70mm) for sweeping terrace shots. For motion blur on waterfalls (e.g., the cascades in Amalfi’s Vallone delle Ferriere or the Fiordo), set aperture ~f/11, ISO 100, and try 1/4–1 second shutter with a tripod. In higher villages (Ravello), the light can be intense; bracket your exposures to preserve detail in the bright sea and shaded alleys. Remember to tilt your camera downward on steep streets to capture the dramatic vertical fall of steps in a single frame.
The Amalfi Coast is within the Eurozone (Italy, euro currency). Main access is via Naples (NAP) or Rome airports (drive or train+bus via Sorrento). Buses (SITA) ply winding coastal roads (single tickets ~€2–€5) or hire a private driver for a day (~€200). Ferries run from Amalfi town to Positano, Capri, Sorrento (tickets ~€10–€20). Many villages shut down in Jan–Feb for “Ferragosto” (Mid-Aug break), so check seasonal schedules. Entry to Villa Cimbrone/Rufolo gardens costs ~€7–€9 (open daily, about 9 am–8 pm). Always carry cash in smaller towns; stores may not take cards.

Carved into pink sandstone cliffs, Petra was the Nabataean capital from around the 5th century BC. Often called the “Rose City” for the warm hues of its rock, Petra’s vast labyrinth of tombs and temples (200+ structures) is one of the New Seven Wonders of the World and a UNESCO site. Its dramatic location – a canyon (Siq) opening onto the Al-Khazneh (Treasury) – provides endless storytelling angles. Every ruin from the Roman-style Theatre to the hidden Urn Tomb has centuries of history in its stone. (GPS: 30.3286°N, 35.4420°E – the Treasury is just beyond the Siq.)
The Treasury (Al-Khazneh) is Petra’s crown jewel, known worldwide. Yes, it’s a tourist magnet, but how to make it your own photo? Instead of the straight-on postcard, try:
Remember: you can shoot the Treasury only from a distance outside – you’re not allowed inside the monument. But above it, the path to the Monastery gives a mini-Treasury view from above (less common).
Petra by Night is a special experience (Thu, Fri, Sat evenings, extra 15 JOD). Thousands of candles line the Siq path and illuminate the Treasury in orange glow as Bedouins tell stories by the reflection pool. Photography here is all about long exposures – use a tripod or steady surface, set ISO to 800 or higher, and exposure 10–30 seconds to capture the flame-lit scene. No flash or tripods on the walk itself, so try to brace your camera on a ledge. The effect is ethereal: the Treasury façade flickers into life against the night sky. Don’t forget a wide aperture (around f/2.8–4) to let in enough light.
The hike up to Ad-Deir (“The Monastery”) involves about 800 stone steps from the start of the Siq. It’s a sweat-worthy 40-minute climb, but the payoff is huge: a grand façade even larger than the Treasury, and panoramic views of the Jabal Haroun summit beyond. At sunrise, the façade glows warmly, and the valley below is filled with morning light. Besides the Monastery, trek to Al-Khubtha Trail for a backshot of the Treasury from above (less visited). The high vantage also reveals the Great Temple and Roman ruins below. Always carry water and good hiking boots – Jordan’s sun is unforgiving. If you want more solitude, visit “Little Petra” (Siq al-Barid), just outside Wadi Musa, where similar carvings stand mostly empty.
Petra is still used by locals and Bedouins; respect is key. Dress modestly and avoid drones (not allowed at UNESCO sites). No leaning or climbing on ruins, and no graffiti! Souvenir horses and camels at the entrance often appear in photos; you can ride them a short way (15 JOD) if you like, but beware pushy guides. Inside the Treasury and tombs, no flash photos are allowed (it’s sacred ground). Always give right-of-way to tour groups or worshippers passing by. After shooting, help preserve Petra by not littering or carving your name – use the many trash bins near the Visitor Center. Following these rules shows courtesy to an archaeological wonder and to Jordan’s hospitality.

Machu Picchu is a 15th-century Inca citadel perched at 2,430 m above sea level in the Andes. A UNESCO World Heritage site, it is one of the world’s most famous “bucket list” photography locations. The classic shot comes from the Guardhouse viewpoint, framing the terraced city below Huayna Picchu’s jagged peaks. During sunrise, mist often clings to the ruins for a magical effect. Pack a polarizer for daytime shots and, if possible, arrive at opening time (6 AM) to capture soft morning light on the stonework. Remember: above Peru’s Inca Trail, Machu Picchu is the high-altitude highlight of any Andean trek.
The iconic “postcard” panorama is from the Terrace of the Guardians (or Guardhouse). To avoid crowds, consider less-known spots. One is the Sun Gate (Inti Punku) at the end of the Inca Trail – it provides a distant vantage with Machu Picchu below and the sunrise illuminating the valley. Another is the agricultural terraces east of the main temple: shooting along the curved dry-stone walls can yield abstract patterns. In general, experiment with foreground framing (doorways, windows) to add interest. A 16–35 mm wide-angle captures the whole citadel; a 70–200 mm zoom compresses layers of mountains and ruins. Midday lighting is harsh; plan to shoot in morning or late afternoon if possible.
Machu Picchu’s two famous peaks – Huayna Picchu and Machu Picchu Mountain – require separate entry permits. These ticketed hikes grant extraordinary overlook shots but sell out months in advance. If you secure a “Huayna Picchu” ticket, you’ll climb a steep stair to panoramic views back over the ruins (carry only a small telephoto for this climb). Without these hikes, the top alternative is the sun gate or the new Guardhouse terraces (Circuit 1B). In practice: “Popular spots like Huayna Picchu, Machu Picchu Mountain, and the Sun Gate require separate permits… booking early is essential.”. If you do hike up, note that some viewpoints (like the Gate) exclude use of a tripod without extra permission.
Entry to Machu Picchu is strictly timed. The special “Sunrise Pass” (5:30 AM entry) is coveted by photographers and often sells out about 120 days in advance. If you miss it, the next slots (6–7 AM) are still excellent for soft light. Weekdays are ~30% less crowded than weekends, and November mornings combine manageable crowds with lush surroundings. Regardless of slot, arrive at least 90 minutes early at the entrance gate to line up. Note the rules: Tripods require special permits and drones are banned, so plan on hand-held shooting or a small monopod. After 10 AM, main viewpoints can become very busy, so many photographers enter at 6 AM or after 2 PM to avoid peak flow.
If you hike (or have trekked) the Inca Trail, several spots yield great images. The classic end-of-trail shot is through the stone Sun Gate at dawn, looking down the Urubamba Valley – this sees Machu Picchu shrouded in clouds. Along the trail, highlight vicuñas grazing on puna grass at sunset, or the ruin Wiñay Wayna (just before Machu Picchu) with its water channel features. Carry a sturdy daypack: the trail is dusty and steep in places. Lightweight rain gear is essential in wet season. And, although tripods are restricted inside Machu Picchu, on the trail you can use them freely at campsites for star-trails or night shots of the Andean sky.

Bora Bora lives up to its iconic status with sweeping views of Mount Otemanu and its teal lagoon. Capture the famous silhouette of Otemanu (a jagged remnant of an extinct volcano) rising behind the water villas at sunrise for a classic shot. On-land viewpoints like the iconic Rotary Park or small hilltops offer panoramic vistas of the lagoon with Otemanu in the center. From water level, kayaking or paddleboarding with the mountain in the background yields romance-themed images. To stand out, try framing Otemanu through palm fronds or positioning the sun behind it at sunset to cast a golden glow. Even shots over the reef with colorful coral below and Otemanu in the distance create a sense of place unique to Bora Bora.
Since you can’t hike Otemanu itself, the key is perspective. Boats or swimsuits in the foreground with the peak looming beyond emphasize its scale. Consider a long lens shot from across the lagoon to compress distance and make the mountain dominate the frame. Evening or dawn light on Otemanu can produce dramatic color – cloud cover often hugs the summit and can catch sunrise pinks or evening purples. If you have a drone (and permission), aerial shots ring the mountain’s base in sheer emerald waters. Onshore, hot-spot photo ops include Matira Point (where the mountain reflects in quiet shallows) or the Four Seasons private motu (islet) which aligns the peak behind their famous infinity pool and overwater villas.
Bora Bora’s lagoon is a photographer’s playground. Underwater, snorkel with rays, reef sharks, and schools of tropical fish for vibrant macro and wide-angle images. On the surface, kayaks or pirogues gliding over the reef (visible through clear water) create beautiful compositions. An aerial perspective (drone or helicopter) reveals the kaleidoscopic reef patterns and motus (tiny islets). Shoreline images of crystal water lapping at white sand or starfish on the beach can be strikingly minimalistic. For animal moments, early morning stingray-and-shark feedings (as offered by tours) let you photograph these creatures in very clear water conditions – keep the sun behind you to light the subjects. Always practice respectful marine photography: no touching or chumming; let wildlife approach naturally.
Bora Bora boasts the world’s original luxury overwater bungalows. These thatched-roof villas on stilts are inherently photogenic. Symmetry works well: center a bungalow arch as your subject, or line them in a row at sunset. Interiors with glass floors provide unique angle of coral below. At night, many bungalows have soft path lighting – long exposures from your deck can turn pathways into luminous lines on water. Behind-the-scenes, you could mention that the first overwater bungalow was built in Tahiti 50 years ago, highlighting how Bora Bora helped popularize them. Today these villas symbolize tropical romance: a shot of a couple on the wooden walkway at sunset or “do not disturb” sign with lagoon view captures the mood. Remember that the bungalows reflect in calm lagoon waters – a placid morning shot will mirror the roofs and sky for twice the visual impact.
Currency: CFP Franc (XPF). Language: French and Tahitian (English widely spoken in hotels). Transport: Bora Bora has a small airport; boats (veolies) ferries or private transfers connect to resorts. Peak Season: May–October (dry season) brings sunny skies and calm seas. Off-Peak: Nov–Apr includes more rain but fewer crowds. Cultural Note: As with all of French Polynesia, courtesy and respect are important – a friendly “ia ora na” (hello) goes far. Connectivity: Wi-Fi is common at resorts. Note: French Polynesia spans a vast ocean region, so electricity is 220–240V, 60Hz (French plug).

Paris’s blend of grand boulevards and intimate cafés keeps it perpetually near the top of “most Instagrammable places in the world” lists. Its classic symbols (the Eiffel Tower, Louvre, etc.) are endlessly photogenic, but savvy photographers look for fresh angles and hidden corners. In fact, one Paris guide notes there are “countless unique photo spots beyond the Eiffel Tower” – from secret gardens to street art in quiet arrondissements.
Don’t just snap the Eiffel from Trocadéro – explore quirky streets and new perspectives. Early morning light can bathe Montmartre’s alleys or Île Saint-Louis without crowds. Look for reflections in puddles on cobbled lanes, capture passing bicycles against Haussmann facades, or photograph the colorful vintage shops of Le Marais. Each arrondissement has its own flavor (vintage shops in Le Marais, flags in Passy, etc. as noted in local guides). These less-obvious scenes keep your Paris feed unique.
Paris offers dozens of ways to frame the Eiffel Tower beyond the classic shot. A few ideas:
Each of these vantage points can turn the same landmark into a fresh shot. (Citing a Paris photo guide: the combination of skyscrapers, lights, and crowds makes Shibuya Crossing “a mesmerizing visual display” – similarly, Paris’s crowd flow and lighting create magic around the Eiffel Tower at rush hour.)
Paris has surprises off the beaten path:
Don’t forget Paris’s street art (for example, Belleville murals), or the tiny Passage des Panoramas arcades for vintage charm. These spots offer Parisian authenticity with fewer crowds than the Champs-Élysées.
A morning café terrace is quintessentially Parisian. To capture Parisian life, focus on outdoor cafés and street scenes. Early daylight in Montparnasse or Saint-Germain can let you frame empty tables and lone coffee cups in soft light. Candid shots of locals chatting or reading at sidewalks illustrate “Parisean lifestyle”. The guide suggests using onlookers and café patrons to create atmosphere, but be respectful: shoot from the side or behind, avoid intrusive close-ups, and leverage the café’s architecture (awning stripes, signs) as framing. Overcast days are ideal for even light on café scenes.
Paris is easy to navigate but requires some planning. The Métro runs all day (consider a Navigo or Paris Visite pass for unlimited 1–5-day use). Most sights are spread over central arrondissements – it’s a very walkable city. Tickets for the Louvre or Eiffel climb should be booked in advance during high season. Safety is generally good, but be mindful of pickpockets on crowded metros and tourist areas (keep valuables secure). Tap water is safe, and a small tip (~5–10%) is customary at restaurants if service charge isn’t included. Note that many cafes charge a small “couvert” fee to use tables. Finally, shooting in Paris is unrestricted in public spaces, but inside museums or palaces check rules (e.g. no tripods or flash in some galleries) and always respect local signage.

Banff National Park, Canada’s first national park (est. 1885), is famed for its dramatic peaks and turquoise lakes. Iconic landscapes here are framed by jagged mountains and ancient glaciers. For example, Lake Louise lies in a U-shaped valley carved by Victoria Glacier, while Moraine Lake sits amid the Ten Peaks range. To capture the grandeur, try a wide-angle view: one can shoot from the lakeshore to include both the water and the summits. Banff is also home to abundant wildlife: “53 species of mammals including grizzly bears, wolves, cougars, and wolverines” call the park home, so be prepared with a long lens (200–600 mm) and watchful for elk or bighorn sheep at dawn.
Moraine Lake’s waters reflect an unbelievable blue-green hue, caused by glacial rock flour in summer. Its viewpoint from the Rockpile trail is legendary – “one of the most photographed locations in all of Canada”. Plan to arrive very early: park access is now shuttle-only (personal vehicles were banned in 2023) due to crowds. The lake is usually open from late June through September; early season (May) often has floating ice. Golden-hour light (just after sunrise) deepens the color and outlines the peaks. A sturdy tripod and polarizer help. In winter, the road is closed (reopens ~June 1), and the lake freezes nearly solid – a completely different scene.
Lake Louise’s mirror-like green waters and the Fairmont Chateau at its far end make for a quintessential shot. From the south shore dock, point your lens north to include the Victoria Glacier and surrounding slopes. For a fresh angle, hike the Little Beehive trail or the Lake Agnes tea house path for elevated views (sunrise from the Beehive is spectacular). In summer, rent a canoe (available at the boathouse) to frame the chalet from the water. “Kayaking and canoeing are popular summer activities” here. In winter, Lake Louise becomes a frozen wonderland – ice-skating on the untouched ice with snow-capped peaks reflected makes a gorgeous contrast. When shooting reflections, watch for moving clouds or ripples; sometimes a longer exposure (1–2 s) will smooth the lake.
Banff’s animals can be surprisingly close to the trails. Along the Bow Valley Parkway or Icefields Parkway at dawn/dusk, you might see elk, moose or deer grazing. Keep at least 50 m from bears and wolves for safety, but with a 200–600 mm lens you can fill the frame from a distance. Park Info: “53 species of mammals including grizzly bears, wolves, cougars, and wolverines”. For birds, the lakes attract osprey, eagles and western grebes. To photograph wildlife: use continuous autofocus, shutter ≥1/250 s (to freeze motion) and a tripod or beanbag for support when idling in a car. Always respect animals – never chase them.
In summer (June–Sept) the park is lush: lakes open for canoes and kayaks, and wildflowers blaze on hiking trails. Sunrise and sunset light is long and soft. Moraine and Lake Louise roads are open (Moraine via shuttle only). In winter (Nov–Apr), the scenery transforms: frozen lakes, snow-covered pines and ice-covered peaks. Lake Louise often freezes by November and becomes a natural ice rink; rentals of ice shoes/skates are available. Roads like Moraine’s are closed until June, so summer-only access. The best photo tip: in snow, shoot in RAW and consider overexposing by ~1 stop (to counteract camera underexposure of bright snow).

In Marrakech, the medieval medina around Jemaa el-Fna square is a riot of color and motion. The narrow alleys create dramatic light shafts, and the souks overflow with spices, textiles, lanterns and other wares. Photographers should aim for early mornings or late afternoons to catch soft golden light on the city’s monuments (like the distant Koutoubia Mosque). From high terraces one can frame the jumble of terracotta rooftops and minarets. The visual spectacle – snake charmers, food vendors and artisans – demands careful composition and patience to find that perfect shot.
Behind the plain exterior walls, many riads (traditional guesthouses) hide lush courtyards. These secluded gardens offer fountains, citrus trees and intricate tilework – a serene contrast to the noisy souks. Though not heavily cited, it’s well known that some riads welcome photographers if you ask politely or stay a night. Shoot through archways or from balcony railings to capture these oases. Portraits of locals tending flowers, or close-ups of carved wooden doors and mosaic fountains, add a human touch against the green-and-azure backdrop.
Marrakech’s souks are a photographer’s playground of color and texture. Focus on close-ups of woven carpets, leather bags and pyramid piles of spices. For example, shop stalls often display vivid red and blue rugs that make striking foregrounds. Portraits of smiling shopkeepers or artisans are also rewarding (be sure to ask first and perhaps buy something). Use a medium aperture (around f/5.6–8) for depth of field and a shutter around 1/125–1/250 s to freeze action; ISO 400–800 helps in the shaded alleys. A small reflector or fill-flash can brighten a subject’s face against a dark shop interior. Remember to haggle and respect local customs – a smile often gets you that photo!
Jardin Majorelle is a botanical garden famed for its intense cobalt-blue pavilion. Created by artist Jacques Majorelle in the 1920s, it later became Yves Saint Laurent’s property. The “Majorelle Blue” walls, set against lush green palms and cactus, make for iconic shots. Best visited as soon as it opens, the garden’s vivid colors and calm light allow symmetrical compositions (frames of cactus against blue archways, or staircases flanked by bright facades). This location is very popular on Instagram, so patience is key to get a clear frame. A polarizing filter can deepen the sky’s blue, and try both low wide angles and portrait modes on the plants and fountains.
For panoramic photos, head to a rooftop terrace overlooking the medina. Cafés like Café des Épices or terraces atop the Hotel de la Rose offer sunset views back over Jemaa el-Fna and the Atlas Mountains. From above, you can shoot the labyrinth of rooftops, satellite dishes and mosques at once. Golden-hour (shortly after sunrise or before sunset) is ideal – the warm light and distant haze soften the scene. A wide-angle lens (f/8–11) will capture the scale of the city, and bracketing exposures is wise to handle sky glare. Don’t forget to capture the city’s daily life from above: a steaming cup of mint tea at dawn or lights coming on across the medina at dusk add atmosphere.

Tokyo’s kaleidoscope of neon, fashion, and tradition makes it one of the world’s most photogenic metropolises. Shiny skyscrapers tower above ancient shrines, and futuristic art coexists with bustling street life. For example, Shibuya Crossing “represents the energy and dynamism of Tokyo” – as a crowd of ~2,500 people surges every light change, it becomes “a mesmerizing visual display” of humanity and lights. Tokyo’s mix of cutting-edge technology and time-worn culture earns it a spot on any “most Instagrammable places” roundup.
From Harajuku’s colorful youth fashion to Ginza’s luxury branding, Tokyo caters to every Instagram niche. Its cityscapes at night (like above) are famous. The highway at night, Shinjuku’s electric district, and the rainbow-lit towers by the bay all provide frame-worthy scenes. Shopping district signs and billboards gleam in reflection off wet streets, evoking a cyberpunk vibe. Behind this glow, traditional sites (Senso-ji, Meiji Shrine) remind you where you are. In short: in Tokyo the contrast itself is art.
Shibuya Crossing is Tokyo’s must-do shoot. At ground level (Hachiko Square), you can stand amid the waves of crossing pedestrians; from above (Shibuya Station 2F, Starbucks, or Shibuya Scramble Square) you get a famous bird’s-eye view. One guide notes “the tower lights reflect off the streets and create a surreal atmosphere,” especially at night. The steps of the QFRONT building (with music countdown lights) are popular for low-angle shots of the crowds. To shoot Shibuya well, try both high and low views. For example, the Shibuya Sky observation deck (in Shibuya Scramble Square) offers a panoramic vantage of the crossing plus the Tokyo Tower on the horizon – perfect at dusk.
Tokyo truly comes alive after dark. Top neon-lit spots include: Shinjuku (Kabukichō) – streets like those above are ablaze with signs; shoot from Omoide Yokocho or the Balcony at Tokyo Metro Gov’t Building for full city views. Akihabara – electric stores and arcades, especially around Chuo-dori intersection. Ikebukuro – the east exit and Sunshine City area have huge colorful billboards. Ginza/Yurakucho – the neon Lanterns of Ginza, especially on Chuo-dori at night. Odaiba – the Rainbow Bridge and the giant Gundam statue glow by the waterfront at night. For an elevated view of Tokyo’s nightscape, go to the free observation deck on the Tokyo Metropolitan Government Building in Shinjuku. From 202 meters up, it’s easy to frame the glowing city grid and bright signs below (and it’s free!).
Tokyo’s digital art is as famous as its city lights. The teamLab collective’s installations are bucket-list items. teamLab Borderless (reopened Feb 2024 in Azabudai Hills) continues to draw crowds for its immersive “borderless” light artworks. The original Odaiba location hosted 2.3M visitors annually. Expect mirror rooms, glowing orbs, and interactive projections perfect for surreal Instagrammable moments. (Also consider teamLab Planets in Toyosu for its water-walk illusions.) Outside teamLab, places like Pokémon Center stores and VR arcades in Shinjuku or Ikebukuro offer colorful neon experiences. These spots turn Tokyo into a digital playground after dark.
One of Tokyo’s signature effects is the juxtaposition of old temples with modern towers. Classic examples: Senso-ji temple in Asakusa with Tokyo Skytree in the background at sunrise; Zojo-ji temple at night with the red Tokyo Tower glowing above. To capture this, find a vantage where the temple gate or pagoda frames a portion of skyline. For instance, at Zojo-ji stand under its main gate and shoot through at Tokyo Tower. Even lesser-known shrines (like Nezu Shrine in Shibuya with neon signs beyond) provide this East-meets-West contrast. Such shots highlight Tokyo’s layering of history and modernity.
Getting around Tokyo is easy with its public transit. An IC card (Suica/PASMO) covers trains, subways and buses citywide. Taxis exist but are costly; overnight train services (like the N’EX airport train) are convenient. Tourist information centers (e.g. at major stations) offer free maps and Wi-Fi. Note that Japan requires mobile phone usage to respect privacy: refrain from phone calls on trains and keep lights dim at night. Power outlets use type A/B plugs (220V, 50Hz). If shooting at Shibuya or Shinjuku, secure your gear – theft is rare but traffic is heavy. And remember: tripods are often disallowed on busy sidewalks or train platforms (so shoot handheld or use a monopod at crowds). Always obey local regulations (for example, drones are very restricted in Tokyo). With these tips in mind, you’ll maximize your Tokyo photo adventure.

With pastel houses huddled at the foot of towering Dachstein peaks, Hallstatt looks as if straight out of a storybook. Its mirror-like lake in front adds to the “visual drama”. In fact, UNESCO’s Hallstatt–Dachstein site description calls this an alpine landscape of “huge mountains rising abruptly from narrow valleys,” noting that Hallstatt’s own name means “salt settlement,” a nod to its salt-mining heritage. The tidy market square, the Evangelical church with spire by the lake, and the wooden facades beneath glacier rock all combine into a composition so perfect it spawned fake replicas (one in China) and boycotts by locals due to excessive tourism.
Casual visitors instinctively snap Hallstatt from the western shore, where the church and mountain reflect in the still water. (The classic shot is from a raised bridge near the northern end.) But our guide knows that beyond the obvious: early morning mist can turn the scene ethereal. Or climb to Salzbergblick (Old Salt Mine) above the town: at dawn or dusk this old salt-porter trail offers a panorama of the whole valley, best with a telephoto lens to compress lake and peaks. In winter, the lake sometimes freezes over, turning reflections into surreal snow-globe stillness. Hallstatt’s cozy alleys and wooden balconies themselves are photogenic – from one side of the square another iconic shot looks past a “Privat” sign to the distant pier, a reminder this is still a living village.
Local Perspective: Hallstatt’s 800 residents endure up to 10,000 tourists daily in summer. A few years back, locals even staged a protest and installed (then removed) a fence to curb selfie-spot crowds. Photographers should respect this tension. In practice, that means shooting with care: don’t block pathways, and ask permission before including locals or private property in close-ups. One older resident summed up the mood: “Hallstatt no longer lives on tourism; it is being squashed by overcrowding.” You can still capture the village’s magic, but best during the lulls – winter or early weekday mornings, when even inns are shuttered and the only sound is cowbells from across the lake.
Given locals’ sentiments, adopt “leave no trace” shooting habits. Visit at dawn and dusk to avoid peak crowds. Use minimalist composition to emphasize nature rather than people. For example, frame an empty bench or a red canoe on the lake before tourists arrive. If someone insists on a gate or railing in frame, transform it into a leading line: occasionally the wooden fence along the boardwalk can guide the eye into the scene.
Insider Tip: If Hallstatt seems overrun, consider neighboring Obertraun (to the south). It offers a cable-car up Dachstein Glacier with panoramic views that rival Hallstatt’s, and far fewer people. Many photographers use Obertraun’s vantage as an alternative (catch the OÖVV bus from Hallstatt for €5).
Use a polarizing filter on Hallstatt Lake to control glare from sunlit mountains. A long exposure in soft light (cloudy dawn or dusk) smooths the lake for mirror-like reflections. Balance the image: often the sky is bright behind Dachstein, so underexpose or shoot in manual to preserve detail. And don’t be shy with telephoto in winter: zoom in on icy textures along the shore or on frozen pond lilies for abstract shots.
Currency is the euro. Hallstatt’s tiny center has no hotel; many stay in nearby Obertraun or Bad Goisern (~15 min by bus). The OBB regional train runs to Hallstatt Bahnhof (40 min from Attnang-Puchheim), but note the station sits across the lake. From there a short ferry (15 min, ~€2) shuttles into town. Hallstatt World Heritage site has no entry fee; the salt mine (€42, half-day trip) and nearby Dachstein Skywalk (€32 including cable car) are extra. Shops and restaurants often close by 6 pm; plan daylight windows carefully. As of 2026, Croatia’s border waits: a passport covers Austria just like its neighbor.

Chefchaouen’s medina is famously painted in every shade of blue. The exact origins are debated: many locals say the blue hue keeps mosquitoes away and symbolizes the sky and heaven, reminding residents of a spiritual life. In the 20th century, Jewish and Muslim families reinforced the custom (some sources note a push in the 1970s to attract tourism). The result is a cityscape that feels almost dreamlike – whitewashed buildings with cobalt shutters, azure alleyways and doorways. For photographers, this means every corner offers a “wow” shot. Aim for early morning light to reduce glare and catch the city before crowds arrive. A neutral outfit helps you blend in for candid street portraits.
The most photogenic spots are scattered throughout the medina. The main square, Place Uta el-Hammam, has fountains and cafés framed by blue walls. From there, wander the zigzag lanes north towards the kasbah and Bab Kasbah gate. Don’t miss “Blue Street” (Tala’a Kebira) lined with artisan shops and famously Said’s orange-juice stall – a popular photo subject (note: you should buy a juice before snapping!). Temple and mosque doors with geometric paint or brass studs also make great details. For a unique sunset view, hike up to the Spanish Mosque just outside the old city: it overlooks Chefchaouen and the Rif Mountains in golden light. Wide shots of the entire medina (from this hill) showcase the sea of blue rooftops.
A typical walking loop starts at Ras El-Ma spring (north-east corner of the medina), a tranquil waterfall-fed pool popular with locals. From there, walk up through the cascaded alleyways to the main square Uta el-Hammam. Next, explore the nearby kasbah and its museum. Descend via the souk streets (with leather and local crafts) to the Grand Mosque (note its rare octagonal minaret). Head south through the medina’s blue-washed lanes, passing the Jewish quarter, and exit near Bab Souk. If time allows, retrace your steps through different alleys to discover shaded courtyards and colorful doorways. For each leg of the route, early morning or late afternoon light will enrich the blues and avoid harsh shadows.
For nature photography, plan a day trip to Cascada d’Akchour (~40 km from Chefchaouen). A moderate hike (about 7 km round-trip) follows a river valley with lush forest and small cascades. The turquoise pools and arching bridges (“God’s Bridge”) are very photogenic. One travel guide notes: “Akchour waterfalls are one of the hidden gems of Chefchaouen: an excursion along the river with many small falls, lakes and cafes through green forest with monkeys”. Go early before hikers arrive; the overhead canopy gives dappled light (a polarizer helps). Warmer months have more flow and greenery. The entrance is in Talassemtane National Park – a guide or clear trail markers are useful for navigation.

Angkor Wat towers over Cambodia’s plains as the largest religious complex on Earth, covering some 162.6 hectares. Built in the 12th century by King Suryavarman II, this sprawling UNESCO World Heritage site (400 km² including forests) contains hundreds of temples and reservoirs. Its name means “City of Temples” in Khmer, and no wonder – Angkor is one of Southeast Asia’s most important archaeological sites. You can almost feel history here: the massive sandstone causeway, moat and five-towered central sanctuary are symbols of both Khmer grandeur and Khmer faith. (GPS: 13.4125°N, 103.8667°E, Angkor Wat entrance.)
Photographers swarm to Angkor at dawn for a reason: the sunrise here is magical. Wide-angle lenses and tripods are essential to capture the long causeway, temple towers and still reflecting pools. Plan to arrive before first light (by 5:00 AM) so you can stake out a spot along the north or south reflecting pools. From the northwest corner of the north pool facing Angkor Wat, you’ll see the towers framed by golden light. (Fun fact: even if you’re late, the view is still beautiful – just know the sun will rise behind the temple, not over it.) Camera Tip: Use a sturdy tripod and exposure bracketing to balance the bright sky and dark temple. Golden-hour rays on the lotus ponds make an unforgettable backdrop.
The massive Angkor Archaeological Park is best tackled in circuits. Small and Grand Circuits are standard itineraries. The Small Circuit (about 30 km) hits the must-see sites: Angkor Wat, the Bayon inside Angkor Thom, Ta Prohm, plus smaller gems like Banteay Kdei or Srah Srang. The Grand Circuit continues farther, looping past Preah Khan, Neak Pean, and more. A typical route (often by tuk-tuk or bicycle) might be: Angkor Wat → Angkor Thom (Bayon, Elephant Terrace, etc.) → Ta Prohm → Banteay Kdei → Preah Khan. This hits the highlights in a day or two. Pro Tip: Start at Angkor Wat for sunrise, then proceed clockwise. Don’t miss Phnom Bakheng or the southern gate of Angkor Thom for vistas of the ruins. Mapping apps or print-out maps can help you hit each site efficiently.
Ta Prohm is the jungle-choked temple of legend. Gigantic ceiba and strangler fig roots coil around every doorway, giving the impression of nature reclaiming stone. Its ruined halls and root-entwined archways famously served as a backdrop for the 2001 Tomb Raider movie (Angelina Jolie). Today Ta Prohm is almost as iconic as Angkor Wat, a photographer’s dream of mossy walls and dappled light. This “forest temple” is on the Small Circuit (about 1 km east of Angkor Thom). Lens Tip: A wide-angle or mid-range zoom captures the scale of roots vs. temple. Crouch low to emphasize the towering roots behind stone carvings.

Imagine a thousand green pools connected by falls, in a primeval beech-fir forest. That’s Plitvice, Croatia’s crown jewel. UNESCO describes it as “a strikingly beautiful and intact series of lakes formed by natural tufa barriers”. The park contains sixteen terraced lakes whose limestone dams (tufa) have been growing for millennia. As sunlight filters through moss and algae that precipitate the travertine, the lakes glow emerald and turquoise; water cascades down dozens of steps, each a fairytale drop into the next pond. No wonder 19th-century visitors dubbed them “watered castles.”
Plitvice’s fame rests on its karst geology. Rain and streams, flowing over dolomite and limestone, have built up travertine walls, giving rise to “lakes, caves and waterfalls”. The park’s eight upper lakes are gentler and wooded, while eight lower lakes lie in a canyon under steeper falls. Photographically, this means variety: mirror-smooth pools like Kozjak reflect autumn foliage; higher falls like Veliki Slap thunder through gorges. UNESCO notes this interplay of “water, air, sediments and organisms” continues to shape the landscape even today. In practice, that means every year the scene is slightly different – and always enchanting.
Upper Lakes (near Entrance 2) feature boardwalks weaving among forest and rounded basins. They’re open and ethereal: for example, at 8:30 am the sun slants through the treetops onto the still waters of Lake Galovac – ideal for wide shots at ~24 mm to capture the curving walkway and glass-like blue water below. In contrast, Lower Lakes (Entrance 1 side) plunge through steep walls. The star is Veliki Slap (78 m high); shoot it from the footbridge for full cascade or from the balcony for scale. When composing, try not to center a single fall; let it trickle in along a rule-of-thirds line, with swirling pool patterns taking the lead.
Tip: The wooden pathways can get slick; bring neutral-density filters for long exposures, but also sturdy shoes. If you need empty trails, start at 8 am or late afternoon – Plitvice closes by 6 pm (shorter in winter), and the light then casts a lovely glow on the ferns and white travertine.
Late spring brings high water volume (snowmelt swelling the falls) and vibrant greens. By summer, flows are gentler but light is usually abundant – ideal for saturating colors (though midday sun can wash out shadows). Autumn is arguably the most cinematic: golden leaves form natural borders around turquoise pools. Winter (Nov–Mar) dramatically transforms Plitvice. With shorter hours, you might catch icicles and partial ice on the lakes, plus steam rising off warm water (at sunset especially). Many wooden bridges remain open, but check for closures on the higher walkways if snow accumulates.
Planning Note: As of mid-2025, single-day tickets cost about €35 (peak season) to €20 (winter) and must be bought online on the park’s official site. The park is open year-round, but the longest walk (Route H) is best done April–October. Facilities (restaurants, boats) are more limited in winter, so have warm gear. Drone use is strictly prohibited in the park. Follow marked trails on the boardwalks – straying off-track damages fragile travertine formations and is fined.
Water shots benefit hugely from a tripod. For silky waterfalls, aim for 0.5–2 second exposures (f/16, ISO100), adjusting per flow rate. Use a polarizer to cut glare and deepen the lake’s colors. In lower light (cloudy or late in day), longer exposures flatten the water surface for a glass effect. Since wind can ripple the lakes, wait for still moments or shield the lens from spray with a cloth. Creative idea: at sunrise or sunset, place a subject (tall tree or statue) in the foreground as a silhouette against the vibrant sky reflected in the lake. The high ratio of water to sky often leads to vibrant color-bounce – take advantage of any color cast from sunrise/sunset.
Croatia uses the euro (since 2023). Plitvice is about 2–3 hours from Zagreb or Zadar by bus. There is no overnight lodging inside the park except one hotel (Entr. 1 area). Most visitors stay in nearby villages (Grabovac, Turanj). Boat shuttles cross Lake Kozjak (€3) and panorama buses link the sections (€1–€2). Entrance gates vary: Gates 1 and 2 (north/south) open ~7 am–7 pm (summer). Seasonal passes allow repeat entries. Visitors should carry water and snacks (cafe stops are sparse). As of 2026, a Covid-era timed entry system remains (check before you go). Balance your day: start at one end early to catch low light, then hike to the other end by afternoon for return.

The vast Salar de Uyuni (10,582 km²) is the largest salt flat on Earth. Its flat white plain creates surreal perspectives: in wet season a shallow layer of water turns it into the world’s largest mirror, blurring sky and ground. Photographers play with scale – one subject far from camera looks tiny next to a nearby friend or object. Come at sunrise or sunset: the low sun casts soft light and often pink-orange hues across the salt. Note the altitude (~3,656 m) – sunblock and water are essential. A polarizing filter can deepen skies; and shoot with a loose tripod (in wet sections it will rust in salt). This flat also makes a 360°-panorama cliché – so get creative!
In rainy season (Dec–Apr), the salt plain partially floods. A still, shallow layer creates a perfect mirror reflecting clouds and stars. These photo ops peak from Jan–Mar; dawn and dusk make for ethereal shots. However, rain can cause overcast skies, so patience is key for clear reflections. In dry season (May–Oct), the water evaporates and you get brilliant white salt crusts. By late dry season (Sept–Oct), the hexagonal salt polygons are at their best. Beware mid-day glare: the sun on white salt is blinding. Instead, shoot on a slightly overcast day (even with few clouds) to reduce harsh shadows. Either season is incredible – wet for reflective “floating” shots, dry for endless white desert – just plan accordingly.
With nothing to give a sense of scale, the Salar is perfect for fun illusions. For instance, try crouching very low with a wide lens pointed up at a friend holding the sun overhead. A travel blog advises: “This shot was taken with a wide angle lens positioned less than an inch above the ground just as the sun hit the horizon.” That low angle can make the salt foreground look like clouds. Place people or objects (like hats, balloons, cars) at varying distances to make them appear gigantic or tiny. HDR or panorama techniques can emphasize the vastness. Even footprints or tire tracks in the salt can lead the eye into the frame. Just keep the horizon level and let the flat expanse dominate the composition.
The Salar’s clear, high-altitude skies are ideal for astrophotography. With almost no light pollution, the Milky Way arches brightly at night. Set your camera on a tripod: try f/2.8 aperture, 15–30 s shutter, and ISO 1600–3200 (experiment for best star contrast). The wet salt can reflect starlight – for long exposures, you might capture faint aurora-like ground glow or star reflections in standing water. Moonlit nights turn the flat ghost-white under star shadows. Remember warm clothing: desert nights at 3,600 m can be very cold. After night shots, get up early – the Salar’s sunrise colors (pinks and purples) are second to none.
Most visitors explore the Salar via multi-day 4×4 tours from Uyuni. For photography, a 3-day tour is ideal: Day 1 crosses the flats to see Incahuasi Island and sunrise, Day 2 reaches large caves or geysers, Day 3 returns. Crucially, spend at least one night on the Salar (e.g. at a salt hotel) to shoot sunset and sunrise on the flat. Choose a small-group or private tour if you can – it lets you stop freely for shots. Ensure the tour provides a jeep with a clear rooftop (for 360° shooting). Verify that your vehicle has enough spare tires – the salt can be rough on rubber. Daylight on the flat is intense; a polarizer and ND filters for long exposures (e.g. at sunset) can yield dreamy skies. Many agencies list “photo tours” specifically for keen shooters; they often include extra sunset stops or private sunset dinners on the salt. Expect to pay more for such custom trips, but it’s worth it for the flexibility.

Dubrovnik’s terracotta roofs, encircled by intact 1.94 km of stone walls, give it the deserved nickname “Pearl of the Adriatic”. Founded in the 7th century, it flourished as the maritime Republic of Ragusa; despite earthquakes and war, its Gothic-Renaissance core endures. Today this UNESCO city is globally famous – not least as King’s Landing from Game of Thrones. In fact, as one Dubrovnik guide proudly states, the Old Town served as the “main filming location in Croatia for King’s Landing”. Photographers can’t escape a sense of history here, nor the sea vistas.
Fans in droves track down GOT sites: the Pile Gate (city’s west entrance at 42.6456° N, 18.0943° E) stands in for the King’s Landing gatehouse, and Lovrijenac Fortress (outside walls) doubled as the Red Keep. For a cinematic shot, climb the city walls themselves: the 1.5–2 hour circuit tops the ramparts and offers sweeping views of the city and Adriatic Sea. One can shoot from battlement walkways – for example, on a summer sunset, the western walls turn golden, and Lokrum Island in the bay is framed like a jewel. A telephoto up on the walls can compress St. Blaise’s baroque church dome against the fortified ridge beyond, blending cityscape and coastal horizon.
Walking the walls is mandatory. Key tips:
– Best time: Arrive 30 min before opening (usually 8 am). The light is soft and there are no crowds on the wall. Golden hour on the walls (sunset) is also magical – head first to the western ramparts.
– Views: From the northern Promenade, look down to capture the harbor reflections or ferry traffic. From near Minčeta Tower (east), get the city-on-cliff angle with the Adriatic beyond. Mid-wall, every bastion offers a new vista of Mjlet and Korčula islands.
– Settings: The high vantage will require narrower aperture (f/11–f/16) to keep fore and background in focus. Use a short tele (85–135mm) to highlight windows or flags on the marble palaces below. If busy, include tourists or pigeons deliberately for human scale.
– Selfie tip: If you must, Ploče Gate plaza by Banje Beach is the setting of Daenerys’s arrival; the view looking back at the Old Town from the outside (42.6432° N, 18.1034° E) is perfect for a widescreen snap after your wall walk.
Historical Note: Dubrovnik’s walls were built from the 12th–17th centuries and survived centuries of siege. In 1667 an earthquake leveled much of the city but the walls held fast; architects later restored them meticulously. UNESCO highlights Dubrovnik’s preservation of Gothic, Renaissance and Baroque monuments despite past earthquakes and conflicts. When you photograph the stone ramparts or Stradun (main street), you’re capturing a heritage that’s “coordinated by UNESCO” for restoration. These are not fake props; each brick has a story from medieval traders to modern festivals.
At sunrise, Dubrovnik’s east-facing walls glow; ships in the harbor silhouette the morning light. However, early sun rises behind Srđ Mountain, so the town appears mostly in shadow – ideal if you want vibrant facades without glare (and ghost-town streets). By midday the stone walls gleam white-hot, crowds peak, and cruise ships arrive in droves. Sunset is dramatic along the west walls: the city sits between sea and sky like a living map. Aim to be on a western bastion by ~7:30 pm (summer) for vivid oranges on St. Ivan’s fortress. Then linger until after dark; blue hour from the walls is unforgettable – the city lights come on and clink off, and the sea darkens to navy under the rising moon.
GoT Filming Locations Map: For fans, we recommend the “King’s Landing Dubrovnik” map. Key shot: the Minceta Tower plaza (north wall) was Joffrey’s Purple Wedding location. Walk through Marin Držić Square for Cersei’s walk of shame scenes. And of course, below the walls on the west, the arcade steps and fountain of Gundulic Square starred in many city scenes. Many photo guides overlay GoT markers on their maps; we embed a custom marker set in the galleries (GPS-enabled).
A polarizer helps here too – the red roofs pop under blue skies and the sea darkens to navy. For the Stradun (marble boulevard), try a vertical shot from Luža Square (near clock tower) leading toward Onofrio’s Fountain; at 42.6407° N, 18.1092° E an ultrawide at dusk can capture streetlights lining the wet stone. Low-angle shots up the narrow alleys (e.g. Široka Street, 42.6412° N, 18.1110° E) dramatize the height of the cathedral’s walls. Finally, night shots from across the bay (45°45′36″N, 15°59′15″E – also visible from Mount Srđ) make the walls look like a glowing fortress island; use ISO 400+ and a steady hand or tripod on the rocks.
Currency is Croatian kuna (until full Euro adoption) but most places accept cards. Dubrovnik Airport (DBV) is 20 min away by shuttle. Cruise ships are a fact of life (every morning in port, 8 am–1 pm, the quays fill), so many photographers avoid the Old Town during 10–14 pm. The city walls (hours ~8 am–8 pm in summer) cost ~€35 to enter; children under 6 are free. Crosswalk caution: traffic can be busy on the causeway to the old town – take the pedestrian bridge on the eastern edge for safe framing of the medieval bridge gate (Ploče). Note as of 2026: Dubrovnik can be very hot (mid-30s°C in July/Aug) with little shade; bring water and sun protection. A climbing trolley to Srđ (cable car ~€12) offers another Instagram view of the city from above, especially in late afternoon light.

The Great Barrier Reef (GBR) is awe-inspiring even before you dive in. In fact, it “is the world’s largest coral reef system covering over 133,000 square miles and the biggest single structure on Earth made by living organisms”. From the air or shore, turquoise shallow waters give way to deep ocean blue outlines of reef shapes. Aerial shots (helicopter or drone) can capture the mosaic of reef atolls and channels. Underwater, use wide-angle lenses to photograph the vast coral gardens and their inhabitants. Start with the famous: giant clams, plate corals, and the resident colorful parrotfish or sea turtles. In all cases, get as close as safety allows to reduce the amount of water between you and the subject – water cuts contrast. Shoot in bright daylight with polarizing filters above water, or with strobes beneath, to bring out the reef’s natural colors and clarity. Remember: the GBR has immense biodiversity (over 1,500 fish species!), so be prepared for literal “too many things to shoot” on every dive.
The GBR stretches along the Queensland coast from just north of Bundaberg up to Cape York. Cairns is the main gateway; from there tours run to iconic spots like the Ribbon Reefs and the Cod Hole (home to huge potato cod). The Whitsunday Islands (Heart Reef, Whitehaven Beach) offer accessible snorkeling and picture-postcard bays. For macro and nudibranchs, try the outer reefs near Lizard Island or the Yongala wreck (near Townsville). Lady Elliot Island has famous manta ray cleaning stations. Farther north, the remote Ribbon Reefs (via liveaboard) deliver solitude and coral density. Each region has a slightly different underwater character, but all share clear, warm water and high visibility – ideal for wide reef panoramas or close-up critter shots. On land, photo-ops include picturesque beaches (e.g. the swirling sands of Whitehaven) and sunrise over Coral Sea.
Shoot the GBR with an underwater camera setup: a wide-angle lens (+ dome port) for reef vistas, and a good macro lens for critters. Bright daylight often suffices, but strobes or video lights help with color and freeze motion on deeper dives. Filters can boost contrast; many photographers recommend a red filter for shallow blue water. Remember to keep a slow shutter around 1/125s to 1/250s to catch fish in motion, and aperture around f/8–f/11 for depth of field. For topside shots, a polarizer filter minimizes glare on the water surface. (Pro tip: many reef images come from overlapping under- and above-water panoramas – consider a sturdily mounted GoPro to do multi-layer shots.)
One of the most dramatic ways to capture the GBR is from above. Scenic flights or drones show the intricate patterns of reef and lagoon. From a helicopter, tilt the camera at a 45° angle on turns to reveal depth and structure. If using a drone (which must be permitted in national parks), fly low over clear water at midday for maximal reef detail. Early morning light can cast long shadows on reef ridges. Popular aerial targets include Heart Reef (an aerial-only icon), the swirl of Hill Inlet, and any sandy cay surrounded by vivid reef. Combining aerial with underwater photos in a multi-exposure image can create striking composite shots – for example, capturing a diver in frame from below and the reef from above.
The GBR is fragile and protected. Always prioritize reef health and animal safety: do not touch or stand on coral, keep fins and cameras at a distance from fish and turtles, and never bait marine life. Use “reef-safe” sunscreen (zinc-based) to avoid polluting water. When photographing, approach slowly and avoid startling animals. Sharks should be approached calmly from the side; never chase them. When posting reef or wildlife images, consider adding a note on conservation to raise awareness. The best photos often come from respectful interaction – for example, waiting quietly for a clownfish to emerge from an anemone rather than forcing the encounter.
Access: GBR spans 1,400 miles; most visitors launch from Cairns, Townsville, or the Whitsundays. Currency: Australian Dollar (AUD). Language: English. Best Times: Southern Hemisphere winter/spring (Jun–Nov) offer calm seas and good visibility; summer (Dec–Feb) is hotter but also cyclone season (stay informed). Permits: Many reef areas are marine parks – recreational diving/snorkeling is generally allowed, but fishing or anchoring on reefs is regulated. Guidelines: Always dive/snorkel with licensed operators. Safety: Waters can have strong currents; only swim in patrolled beaches. Watch for stinger jellyfish in warmer months (stinger suits may be needed). For drone use: Australia’s rules apply (drones banned over many national parks without approval).
In northern Hunan province, Zhangjiajie National Forest Park is famed for its towering sandstone pillars and lush forests. Its otherworldly scenery so impressed filmmaker James Cameron that he modeled Avatar’s “Hallelujah Mountains” on this very landscape. Enveloped in nearly perpetual mist, countless jagged pillars soar hundreds of meters into the sky. One of them (the 1,080m Southern Sky Column) was officially renamed Avatar Hallelujah Mountain after the film. The park’s 4,800-hectare Wulingyuan area is a UNESCO World Heritage site (1992). Photo ops abound: sunrise light spilling over the peaks, fog threading between pinnacles, and vibrant vegetation clinging to sheer cliffs. Tip: For sweeping panoramas, head to the Huangshi Village or Qinglongxia (Emperor’s Balcony) viewpoints early; for intimate shots, wait for misty clouds to drift through the valleys.
The weather in Zhangjiajie is foggy much of the year – a blessing for photographers. Early mornings and humid days often yield low clouds weaving through peaks, creating a mystical “island mountains” effect. Embrace the fog: silhouettes of pillars emerging from mist can look as magical as clear-sky shots. Overcast conditions also diffuse light, reducing harsh shadows on sandstone. Photo Tip: Set a higher ISO (or use a tripod) for mist shots, and try a slow shutter to blur moving clouds for a dreamlike feel. If it’s completely socked-in, explore the river valleys instead (e.g. Golden Whip Stream) for stream reflections and lush greenery.
Zhangjiajie’s park has several cableway-linked zones. A common itinerary: Day 1: Tianzi Mountain (via cable car) at sunrise, then head to Yuanjiajie (via Bailong Elevator and shuttle buses). Day 2: Wulingyuan Plaza to Glass Bridge/Grand Canyon (for midday or sunset shots). As an alternative, hike down from Huangshi or Tianzi viewpoints on foot trails to discover hidden clearings and unique angles. For twilight and night, consider photos of lit pathways in Wulingyuan village. Plan to use the park buses and cable cars to save time (parking is limited). There is also a one-way shuttle train through the more remote Tianzi and Yuanjiajie paths. Check the park map each morning – shrouded peaks can quickly become clear or vice versa, so it’s wise to adapt your plan to catch the most photogenic light.

Cinque Terre’s five tiny fishing villages along Italy’s Ligurian coast are a staple on “most Instagrammable places in the world” lists, thanks to their pastel houses and sparkling blue harbor. Each village has its own charm:
The Sentiero Azzurro (“Blue Trail”) links all five villages with jaw-dropping sea vistas. Hikes between towns yield new angles on the villages and open ocean. For example, the trail up above Vernazza (towards Corniglia) climbs to the 208m-high Prevo ridge with lemonade stands and panoramic views. Starting at sunrise is a photographer’s dream – the soft morning light and empty paths (e.g. capturing sunrise over Manarola) can be magical. Tip: Pack water and leave early to beat both crowds and the afternoon heat.
Cinque Terre has a mild Mediterranean climate. The best visiting season is mid-March through late October. Spring (March–June) brings wildflowers and pleasant hikes; early fall (Sept–Oct) offers warm weather without the July/August crowds. Summer (July–Aug) is very hot (30°C+) and extremely busy. Even off-season (October) can be nice, but note that rain and some trail closures happen in winter. Aim for April–June or September–early October for the ideal balance of weather and light.
Cinque Terre is car-free – villages are best reached by train or ferry. The Cinque Terre Card (Trekking or Treno MS options) gives access to all marked hiking trails and unlimited rides on the Cinque Terre Express trains (Levanto↔La Spezia). A 1-day train+hike pass costs about €20–€33 (buy at stations or online). Trains between villages run frequently (~2x/hour). In high season, buy train tickets in advance or get the Cinque Terre Treno card for convenience. Ferries (spring–autumn) provide scenic access but check schedules.

New York City’s skyline and streetscapes offer endless photo opportunities in every season. Iconic architecture and parks – from Central Park’s greenery to the Empire State Building’s classic Art Deco silhouette – make almost every corner picture-worthy. Even mundane urban moments can be captivating: busking musicians on Broadway or bustling crosswalks in Midtown. With vibrant street life and changing light, “there’s no better place for street photography than New York”. Nature also creeps in: the city’s new high-rises and parks reflect an emphasis on urban greening and vertical gardens. For example, innovative projects like rooftop parks and “vertical forest” facades (inspired by Milan’s Bosco Verticale) are cropping up in the skyline, blending nature with city life.
Iconic New York scenes – Times Square, the Brooklyn Bridge, the Statue of Liberty – are worth revisiting with a fresh eye. Try long exposures of Times Square at dusk to blur motion, or shoot the Brooklyn Bridge from its Manhattan overlook at sunrise for golden light. Central Park’s Mall or Bethesda Fountain can feel new in winter snow or spring bloom. Reflections are everywhere: capture skyscrapers mirrored in puddles or in office windows. Even Midtown traffic at night can turn into light streaks on film. Mixing classic backdrops with unusual angles (e.g. photographing the Flatiron Building reflected in nearby shop windows) makes familiar shots more creative.
New York also hides little “green gems” above its streets. Photographers like Peter Massini have documented rooftop patios and gardens scattered atop Midtown buildings, calling them “hidden oases” that blend concrete and greenery. One of the city’s best-kept secrets is Rockefeller Center’s upper deck: 620 Loft & Garden (and its sister 610 Loft & Garden) atop Fifth Avenue. These elevated gardens offer manicured greenery and reflective pools with panoramic views of St. Patrick’s Cathedral and the famous Christmas tree. Other elevated parks, like the High Line or boutique hotel roof gardens (e.g. The Press Lounge or 230 Fifth), similarly provide lush overlooks. Seek out rooftop bars or hotel terraces after dark for skyline shots, or time visits to Spring’s High Line azalea blooms for hidden floral backdrops above the city noise.
New York’s streets themselves are endlessly dynamic. The jumble of brownstones, taxi cabs, vibrant signage and characters (fashionable locals, artists, or street performers) makes for striking candids. Busy neighborhoods like Chinatown, Harlem or DUMBO each have a distinct texture. On Broadway or in SoHo you can find dramatic lines of light and shadow, while the Theater District is a neon spectacle at night. In Midtown or the Financial District the angled sunlight can create sharp contrasts on skyscrapers and pedestrians. Indeed, “with everything from bright lights to bustling streets, there’s no better place for street photography than New York”. For authentic shots, wander side streets and local neighborhoods (East Village, Williamsburg) to capture the city’s real-life rhythms beyond the tourist hubs.
To catch Manhattan’s skyline in the golden or blue hour, think beyond Midtown. One top spot is Brooklyn Bridge Park in Dumbo, where the bridge frames the skyline – perfect for sunset colors. On the Manhattan side, Gantry Plaza State Park in Long Island City (Queens) or Hoboken Pier C in New Jersey offer unobstructed river views across the East River. Indeed, photographers recommend vantage points like Hoboken, Weehawken and Jersey City (“perfect spots to photograph the New York skyline”) as well as Brooklyn Bridge Park. Closer in, Top of the Rock (Rockefeller Center) and the Empire State Building observatory each give sweeping city views at sunrise or sunset. For a very local angle, grab a shot from Brooklyn Heights Promenade (sunrise over the East River) or Freedom Tower’s 9/11 Memorial plaza (westward sunsets). As one photographer notes, iconic skyline locations “will be full of photographers on any given evening” – so arrive early to stake a spot.
New York is accessible year-round. Currency: US Dollar (USD). Language: English (Spanish and other languages also common). The city spans 5 boroughs; Manhattan and Brooklyn are most central for tourists. Getting Around: Subway and taxis easily cover most neighborhoods (MetroCard required). Best Times to Visit: Spring (Apr–Jun) and Fall (Sept–Oct) offer mild weather and smaller crowds. Summer (late May–Sep) and the holiday season (Nov–Dec) are high-season with heavy tourist traffic. Winters (Jan–Mar) are cold but quieter and cheaper. If timing an Instagram photoshoot, plan for clear skies and golden hours (check sunrise/sunset times).

Modern travel photography strikes a balance between quality and portability. Equipment has advanced dramatically: today’s flagship smartphones rival mid-range cameras, while mirrorless systems have made professional image quality lighter and more accessible. But great gear still matters for top-tier travel shots. The right tools amplify your creative options, from capturing fast-moving wildlife to low-light cityscapes. This section outlines essential photo equipment for the well-prepared traveler, updated for 2026/2027.
Smartphones remain the go-to travel camera for many, thanks to their convenience. Top models like the Apple iPhone 16 Pro, Samsung Galaxy S24 Ultra, and Google Pixel 8 Pro feature multiple lenses (including wide-angle and telephoto) and advanced image processing. They excel at bright scenes and increasingly at night photography. For example, modern phones use AI-assisted night modes to brighten dark shots. While no phone yet matches a full-frame sensor, a phone’s always-with-you advantage is huge for spontaneous moments.
Serious photographers often prefer interchangeable-lens cameras. In 2026, the mirrorless revolution means most “classic” DSLRs (Nikon, Canon) now face stiff competition. Mirrorless bodies (Sony, Fujifilm, Canon’s R series) pack large sensors into smaller frames, with electronic viewfinders for real-time previews. DSLRs still offer excellent quality and long battery life, but they tend to be bulkier.
Your lens choice defines your perspective. Here’s a quick guide:
Pack at least one zoom and one prime if possible. Note that some iconic shots may call for creative options: a fisheye or ultra-wide for dramatic effect at, say, the Grand Canyon or Petra.
Drones can deliver unique aerial views – overhead river bends, terraces, or dense city grids – but regulations are crucial. In recent years, many destinations have imposed strict drone rules. For example, flying drones near historical monuments (like the Acropolis or Santorini’s Oia) is often banned for safety and privacy reasons. Before you launch: check local laws and register your drone if required.
Aside from camera bodies and lenses, consider these practical extras:
– Tripods: A sturdy travel tripod enables long exposures (city lights, Milky Way) and razor-sharp landscapes. Carbon fiber tripods save weight.
– Extra batteries & chargers: Always pack spares. Cold or remote locations drain power faster. Consider a compact battery pack for charging USB devices.
– Memory Cards: Carry at least two high-capacity, high-speed cards (64–128GB). If shooting 4K video or RAW bursts, overflow is common.
– Filters: Polarizers intensify skies and reduce reflections (useful on sunny beach days or reflective lakes). Neutral density filters let you do silky-water exposures in daylight.
– Camera Bag: A weather-resistant sling or backpack with modular compartments protects gear and allows on-the-go packing changes.
– Protective gear: Rain covers, lens cleaning kits (for dust/salt spray), and padded wraps are invaluable in unpredictable conditions (beach, desert, jungle).
Post-processing turns a good photo into a great one. Even on the road, powerful editing apps are at your fingertips:
– Adobe Lightroom Mobile: A professional’s choice, Lightroom’s phone app offers robust controls (color grading, exposure, selective editing). Edits sync with the desktop version if you subscribe.
– Snapseed (Google): Free and user-friendly, Snapseed is excellent for quick adjustments and has features like healing and perspective correction.
– VSCO: Known for film-like filters, VSCO also offers exposure and color tweaks. It’s useful for creating a consistent look across an Instagram feed.
– Darkroom / Afterlight: These and similar apps are popular for ease-of-use on iPhone. They provide advanced controls (curves, HSL) in simpler interfaces.
For desktop editing once home, Adobe Lightroom (Classic) and Photoshop remain industry standards. Captions should note basic edits: boosting contrast, sharpening key details, and ensuring correct white balance before posting.
Insider Tip: Always back up your photos each day (cloud or external drive). Losing a single epic shot because of one faulty card can be heartbreaking.

Beyond capturing a gorgeous image, getting it seen on Instagram requires strategy. The platform’s algorithms and user behavior shape which posts go viral. For aspiring travel influencers or anyone sharing adventures, staying current with how Instagram works is key. In 2026, content variety (Reels, carousels), timing, and genuine engagement matter more than ever. Below are essentials for success.
Instagram no longer relies on a single algorithm; multiple AI systems rank content in different feeds (Home, Reels, Explore, Stories). The common thread is relevance: content that a user is likely to enjoy. Instagram has emphasized transparency recently. As Buffer explains, there isn’t an inherent bonus for Reels per se – instead, each feed (Reels vs. Posts) has its own criteria. What Instagram has said is important includes: use of trending features (Reels, Stories), consistent posting, and authentic engagement.
In late 2025, Instagram announced de-emphasizing hashtags for reach: “hashtags don’t help reach,” per Buffer. The new focus is on keywords in captions and overall content quality. Instagram suggests using 3–5 relevant hashtags rather than dozens. In practice, that means tag sparingly but smartly: choose a few location-specific or niche travel hashtags (e.g. #KyotoCherryBlossom or #ArcticLight) that truly match your photo, and rely on caption keywords to guide discovery.
The enduring rule: post consistent, original content. Buffer’s research shows creators who post regularly (several times a week) get roughly five times more engagement than irregular posters. Mix it up: use all formats – single images, multi-photo carousels, Stories, and especially Reels. Instagram nudges users toward new features, so including at least some Reels can boost discoverability. Most importantly, focus on storytelling: Instagram itself advises, “Authenticity and transparency are key to building sustainable engagement”. In short, publish thoughtfully, stay on-brand, and adapt to new Instagram features without forcing gimmicks.
In recent years Reels (short videos) have dominated Instagram’s growth, but photos and carousels remain powerful. The buffer guide clarifies: no content type has guaranteed priority – the winner is what your audience prefers. That said, video content can reach new audiences via the Reels feed (which is fully algorithmic). For travel creators, this suggests:
– Use Reels for dynamic storytelling (e.g. a 30-second montage of your day in the Alps). Short Reels (30–90s) tend to get more reach.
– Use photo posts and carousels to share polished images or narrative series (e.g. “Best of Santorini in 5 photos” carousel). Carousels can also embed video clips.
– Leveraging both builds momentum: a viral Reel can get your account noticed, then you can follow up with related image posts.
But avoid forcing it: if your strength is stunning photography rather than videography, prioritize image posts, perhaps with simple time-lapses or pan videos. Always tailor format to content. And remember Instagram now personalizes for each user’s habits: someone who mainly watches Reels will see Reels, whereas a feed-scroller sees photos. So diversify.
Timing still influences engagement, even with an algorithmic feed. Global studies (Sprout Social) find overall peak Instagram activity weekdays mid-morning to late afternoon. For example, Tuesdays through Thursdays from about 11 AM–6 PM (in the user’s time zone) often show highest engagement. Travel content, in particular, has unique patterns: Sprout’s 2025 data indicates Sundays see especially high engagement for travel and hospitality brands – not surprising since weekends are when people dream of travel. They note Sundays at ~10 AM or noon were “peak” for travel posts.
Regional differences do exist. For Europe vs. Asia vs. Americas, you’ll adjust by a few hours. In general:
– Use Instagram Insights: If you have a Creator/Business account, check your followers’ active hours in Instagram Insights. This can show you precisely when your audience is online.
– Consider time zones: If targeting a specific country (e.g. posting about Bali to an Asian audience), post during their morning or evening.
– Experiment: A/B test slightly different times. Some creators use scheduling tools (like Sprout’s ViralPost®) that algorithmically pick optimal slots.
Key takeaway: aim to share your content when your followers are most likely scrolling – often midday local time on weekdays and weekend late mornings. Then monitor and adjust; the “best time” can shift with new trends.
Hashtags can still help people discover travel posts, but the trick is relevance over volume. The latest Instagram guidance (Dec 2024) suggests loading up on keywords instead, but micro-strategies still matter: use a mix of
– Broad hashtags: e.g. #travel, #photography, #adventure (high volume, but competition too).
– Niche/location tags: e.g. #Kyoto, #GrandCanyon or #MorningInIceland (lower volume, but highly targeted audience).
– Community tags: there are Instagram “community” tags like #passportlife or country-specific tags (#VisitItaly) that connect interested viewers.
Remember: only 3–5 hashtags. Don’t tag everything under the sun. As Later.com notes, well-chosen tags improve visibility by categorizing your image, but overdoing it looks spammy. Also consider adding a branded tag if you’re running a campaign (#ExploreWithUs), though that’s optional. Finally, placing hashtags in the first comment instead of caption can keep the caption clean while still indexing your tags.
Insider Tip: Save hashtag sets in advance. (Tools like Buffer’s Hashtag Manager can store groups of tags for quick use.) This saves time and ensures consistency across posts.
At the heart of Instagram growth is community. Engaging with your followers, and vice versa, signals to the platform that your account is interesting. As Buffer recommends, focus on genuine interactions: respond to comments on your posts and answer DMs promptly. Use Instagram Stories’ interactive stickers (polls, Q&As, quizzes) to spark two-way communication. For travel content, this might look like “Which outfit should I wear on the hike?” poll, or “Ask me anything about Patagonia.”
Also, highlight your audience. Repost user-generated content (with permission) when followers tag you, or shout out community members. This not only provides fresh content but shows you value your network. Micro-influencers often excel at this grassroots approach.
The algorithm favors “saves” and shares, too. Encourage saving by hinting at a guide or tips (“Save this post for your Italy packing list!”). Encourage sharing by tagging friends in comments. These organic boosts come from real interest. In fact, Instagram’s Creator team emphasizes that “authenticity and transparency” foster sustainable engagement. So rather than gimmicky contests, share behind-the-scenes moments and personal travel stories. Over time, a loyal community will grow around your explorations, amplifying each post’s reach
For creators wondering how Instagram can pay the bills: travel content offers several income streams beyond freebies. A 2026 travel affiliate guide lists top programs (e.g. hotel booking affiliates, tour companies) that send commissions when followers book through your link. Affiliate marketing is indeed “one of the best ways” for travel influencers to earn stable income. For instance, adding booking links (for hotels, tours, insurance) in posts or stories can generate passive revenue whenever followers travel themselves.
Sponsored partnerships are another route. Travel brands, airlines, and gear companies often collaborate with influencers for paid posts. To attract these deals, build a coherent niche (e.g. luxury travel, budget backpacking) and highlight your engagement stats. Don’t forget Instagram’s own Creator tools: features like affiliate tag program and Reels bonuses (in certain regions) allow creators to earn commissions or ad revenue directly from the platform.
Finally, consider selling your own products: ebooks with travel photo tips, prints of your best shots, or even organized photo tours. Whichever mix you choose, diversification is key. As TravelCollabs notes, combining affiliates with brand deals and ads lets creators “diversify income streams” for stability.

These 25 destinations – from the pastel-cliffed villages of Santorini to the firebird curtains of the Icelandic sky – offer endless opportunities to capture travel’s magic. Armed with the right gear, a savvy Instagram strategy, and a commitment to responsible photography, you can explore them fully and thoughtfully. Remember that every photo tells a story: let your images convey respect for cultures and ecosystems, not just a perfect tableau.
Photography is both art and reflection. As you wander cobblestone streets or remote highlands, listen to what locals share and absorb the setting’s atmosphere. Let that sensibility come through in your shots. With the perspectives, tips, and insights above, you’re equipped to not only take beautiful pictures, but also to enrich your travel experience.
The world’s most Instagrammable places await your lens – go forth, explore deeply, and illuminate these scenes with creativity and conscience. Safe travels, and may your camera roll inspire wanderlust in others for years to come.
Q: What exactly makes a place “Instagrammable”?
A: An Instagrammable place typically has visually striking attributes – dramatic landscapes, colorful architecture, or cultural uniqueness that “pops” in photos. Symmetry (like Hallstatt’s alpine town reflected in a lake), vibrant colors (Morocco’s blue city of Chefchaouen), or iconic subjects (Taj Mahal’s silhouette at sunrise) all help. The key is something viewers immediately recognize as special. In practice, these locations often combine natural beauty with photogenic human touches, e.g. Santorini’s white-and-blue buildings or Bali’s terraced rice fields with cultural elements.
Q: Should I focus on Reels or standard photo posts for travel content?
A: Use both strategically. Reels (short videos) tend to have wider reach due to Instagram’s emphasis on video content. They’re great for “you-are-there” experiences: flying through a street market or a time-lapse of the northern lights, for instance. Standard photo posts and carousels, however, allow you to share multiple high-quality images (up to 10). For travel photography, a carousel could show different angles of one scene or a sequence (e.g. a day-long journey). Many successful creators post a Reel to hook new followers, then follow up with related photos in the feed to deepen interest.
Q: How do I avoid crowds when shooting popular spots?
A: The main strategy is timing. Arrive at famous sites either before dawn or after dusk. For example, shooting Machu Picchu or Disney’s castle before sunrise means few people are around. Off-season travel is also key – many “Instagrammable” places see peak crowds in summer or holidays. If your schedule is fixed, consider lesser-known viewpoints: a short hike or side alley can yield a similar scene without the throng. Lastly, some photographers patiently wait out crowds by switching locations periodically; while others employ composition tricks (like shooting down narrow alleys or using a telephoto to isolate a subject against the architecture).
Q: Are there common legal or safety issues for travel photographers?
A: Yes, especially with drones and photography permits. Many heritage sites forbid drones without approval. Commercial photography (selling prints or using images for profit) can require permits, even if you’re just an amateur photographer. For instance, placing a tripod on a crowded European square might draw the ire of authorities. Always check regulations in advance (national park websites, tourism bureaus, or official tourism boards often publish rules). Respect any “no photography” signs in museums or religious sites. As for safety: keep equipment secure (don’t flash expensive cameras in unsafe areas) and insure high-value gear against theft or damage.
Q: What’s the best camera/lens setup for shooting the Northern Lights?
A: For Aurora photography, you’ll want a camera that handles low light well (good high-ISO performance) and a wide-angle lens (to capture the sky expanse). A mirrorless or DSLR with a full-frame sensor, coupled with a 14–24mm f/2.8 or similar, is ideal. Bring a sturdy tripod and set a shutter around 5–15 seconds (depends on brightness), ISO 800–3200, and aperture wide open (f/2.8 or wider). The exact settings depend on your gear, but those are a starting point. Also, a remote shutter release or self-timer helps eliminate shake. If you’re shooting Northern Lights on a smartphone, look for a “night sky” mode in apps like NightCap (iOS) or use manual camera apps on Android.
Q: How can travel creators balance sharing photos with protecting fragile sites?
A: Responsible creators focus on ethical practices. This means avoiding promotion of environmentally sensitive locations (for example, delaying precise location tags for fragile wildlife spots), and educating their audience. Many now include captions reminding followers to respect nature: “Please stay on trails,” or “Responsible travel tip: leave no trace.” When beautiful “secret” spots become known through social media, creators should consider whether to share or not. The guiding principle is to inspire admiration of a place while ensuring its protection; if you sense a photo may encourage harmful behavior (climbing ruins, disturbing wildlife), err on the side of caution.
Q: What’s the difference between an Instagrammable trip and a regular trip?
A: An Instagrammable trip often includes itinerary choices aimed at photogenic value. That might mean traveling slower through fewer places (to capture multiple lighting conditions), or heading to off-peak seasons. Instead of squeezing famous sites into a tight schedule, a photographer might spend hours waiting for the perfect light. In contrast, a “regular” trip might prioritize experiences (like dining, hiking, relaxing) over maximum picture time. Both trips enjoy the destination, but an Instagrammable trip emphasizes scouting angles, dawn/dusk shoots, and detail. Ideally, find a balance: good photos enrich any journey, but they’re one part of experiencing a culture.
Q: Which of the 25 Instagrammable places is budget-friendly?
A: Many top sights vary in cost. Budget travelers often target places like Bali, Mexico’s coastal pueblos, or Vietnam’s temples, where lodging and food are affordable. Even some “big” locations like Marrakech or Oaxaca can be cheap if you stay in hostels and eat street food. In Europe, cities like Prague or Budapest offer lots of photo ops at modest budgets (compared to, say, Paris or Amalfi Coast). Our Comparison Matrix above lists examples by budget tier. The key is advance planning: budget accommodations near photogenic sites can save both money and time.
Q: Can I sell the photos I take at public places?
A: Generally, you can sell photos of public landmarks because public spaces don’t have copyright. However, if your photo includes recognizable people, you should avoid selling it as an advertisement (that might require a model release). Some countries have stricter image rights (e.g. France requires releases for people in photos sold commercially). When photographing on private land or paid-entry sites (like inside a museum), check the property’s photography policy. Many tourist sites allow personal photos but restrict commercial usage. It’s always best to double-check and, when in doubt, attribute the location and ensure you have permission if selling prints or commercial use.


